How to Hold a Chef’s Knife: A Beginner’s Guide to Grip and Control
Quick Answer
To hold a chef’s knife, use a pinch grip: place your thumb on one side of the blade near the handle and your bent index finger on the opposite side. Wrap your remaining three fingers comfortably around the handle, keeping your wrist relaxed. Use your other hand to hold food with curled fingertips, and practice slow, controlled cuts on a stable cutting board.
How to Position Your Hands
- Find the blade heel: Locate the part of the blade closest to the handle.
- Pinch the blade: Hold the blade near its base between your thumb and index finger, away from the cutting edge.
- Wrap the handle: Curl your middle, ring, and little fingers around the handle.
- Relax your wrist: Keep your grip secure without squeezing excessively.
- Protect your fingertips: Curl the fingers of your guiding hand inward and keep your thumb behind them.
- Start slowly: Make a few controlled cuts before attempting a faster chopping rhythm.
One Important Safety Check
- Secure the cutting board, dry your hands, and keep your fingertips tucked away from the blade before cutting.
Learning how to hold a chef’s knife properly makes everyday food preparation feel more controlled and less tiring. You don’t need professional speed or years of cooking experience to build good knife habits.
In this guide, I’ll explain the pinch grip, show you how to position both hands, compare common holding styles, and cover the mistakes that make cutting harder than it needs to be.
What Is the Correct Way to Hold a Chef’s Knife?
The pinch grip is a common professional technique in which your thumb and index finger hold the blade near its base while your other three fingers wrap around the handle. This hand position gives you direct control over the blade instead of relying entirely on the handle.
The goal isn’t to squeeze as hard as possible. You want a secure, balanced hold that lets you guide the blade without unnecessary tension.
A chef’s knife has several parts that help you understand this grip:
- Blade: The metal section used for cutting.
- Heel: The broad rear portion of the cutting edge, nearest the handle.
- Spine: The thick, unsharpened top edge of the blade.
- Handle: The part held by your remaining fingers.
- Bolster: A thick junction between blade and handle on some knives.
The precise contact point depends on the knife’s design. For most conventional chef’s knives, start with a light pinch near the heel, where the blade meets the handle, and adjust slightly for comfort.
North Carolina State University Extension also recommends gripping close to the blade and using a curled guiding hand. Its chef’s knife cutting guide is a useful reference for practicing these fundamentals.
How Do You Hold a Chef’s Knife Step by Step?
 Save
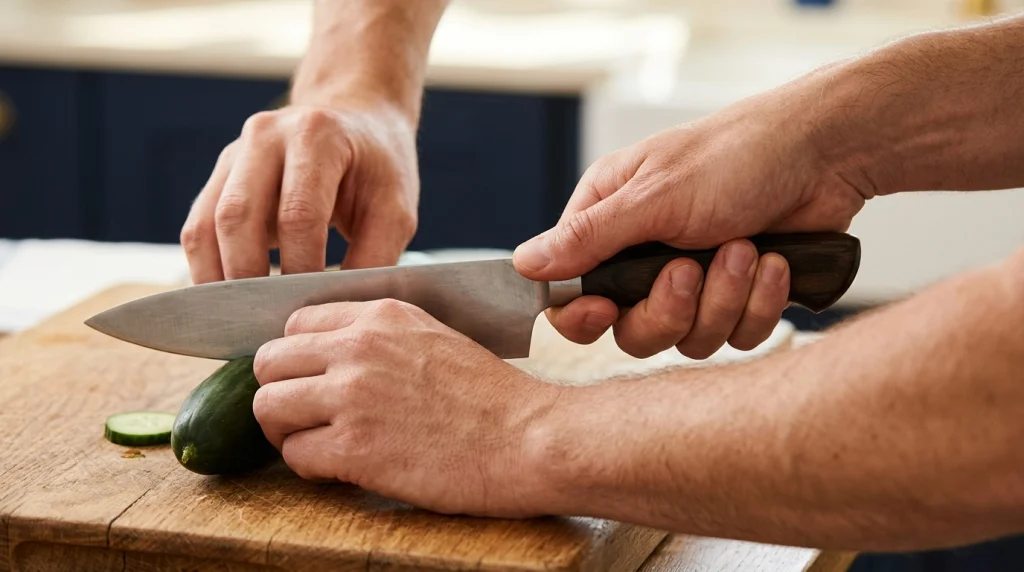
Start with the knife resting securely on the cutting board. Follow these steps to establish a comfortable grip before you begin cutting.
1. Place Your Thumb and Index Finger Near the Blade
Position your thumb against one flat side of the blade near the heel. Place your index finger on the opposite flat side, slightly bent rather than stretched along the spine.
Your fingertips must stay well away from the sharp cutting edge. The two fingers should gently pinch the blade, not clamp down with excessive force.
2. Wrap Your Other Three Fingers Around the Handle
Curl your middle, ring, and little fingers around the handle. Keep them relaxed but secure, allowing your whole hand to move as one unit with the knife.
Check that the handle doesn’t twist or slide in your hand. If it does, stop and reposition your fingers before continuing.
3. Keep Your Wrist in a Natural Position
Hold your wrist in a comfortable, mostly neutral position instead of bending it sharply sideways. Align your forearm with the direction of the cut as much as the task allows.
A relaxed wrist makes repeated movements easier to control. It also helps you avoid compensating for a poor grip by squeezing harder.
4. Test Your Grip Without Cutting
With the knife safely resting on the board, check whether your fingers feel secure and your thumb and index finger remain comfortably positioned. You should be able to maintain the grip without pain, numbness, or excessive pressure.
If the knife feels too large or heavy to control, consider trying a shorter blade. A 6-inch chef’s knife may feel easier to manage than a traditional 8-inch model for some beginners.
5. Practice a Slow Cutting Motion
Place a stable piece of food on the board and keep your guiding hand in a claw position. Make slow, deliberate cuts, keeping your attention on the blade and your fingertips.
Don’t chase speed. Consistent positioning and controlled movement matter more while you’re learning.
How Should You Position Your Other Hand?
Your guiding hand holds the food steady and helps control the thickness of each cut. Use a claw grip by curling your fingertips inward, keeping your thumb tucked behind your fingers, and placing your knuckles toward the blade.
The flat side of the blade can gently follow your forward-facing knuckles as you cut. Your fingertips stay behind them instead of extending toward the cutting edge.
- Curl your fingertips: Keep the tips tucked inward rather than flat against the food.
- Position your thumb: Place it behind your fingers so it doesn’t protrude toward the blade.
- Move gradually: Advance your guiding hand in small increments as the food gets cut.
- Keep food stable: Create a flat side on round vegetables before cutting them into smaller pieces.
For example, when dicing an onion, cut it in half first and place the flat side against the board. Your guiding hand can then stabilize the onion while your knuckles help direct the blade.
Never assume a claw grip makes your hand injury-proof. Keep your movements slow and controlled, and stop if the food starts slipping.
Pinch Grip vs. Handle Grip: Which Is Better?
The pinch grip generally offers more direct control for slicing, dicing, and chopping. A handle grip can still work for beginners who find pinching uncomfortable, provided they maintain a secure hold and safe cutting technique.
| Feature | Pinch Grip | Handle Grip |
|---|---|---|
| Hand position | Thumb and index finger contact the blade near its base. | All fingers wrap around the handle. |
| Blade control | Direct control close to the blade. | Less direct contact with the blade. |
| Learning curve | May feel unfamiliar at first. | Often feels natural to new cooks. |
| Best suited to | Controlled everyday slicing, dicing, and chopping. | A comfortable alternative when the pinch grip doesn’t suit your hand. |
| Main consideration | Requires comfortable finger placement on the blade. | May provide less precise control for detailed cuts. |
Neither grip removes the need for safe technique. Choose a position that gives you control, doesn’t cause pain, and works with the design of your knife.
If you’re learning from scratch, practice the pinch grip first. If your hand size, grip strength, or knife design makes it uncomfortable, a secure handle grip is a reasonable alternative.
How Should You Move a Chef’s Knife While Cutting?
Your grip should support the cutting motion rather than force it. Most everyday kitchen tasks require a smooth downward, forward, or rocking movement, depending on the food and the blade’s shape.
For Slicing
Guide the blade through the food with a controlled forward-and-down motion. Avoid pressing straight down with excessive force or pulling the knife toward your body.
Use the length of the blade when appropriate. A smooth slicing movement often works better than repeatedly pounding the same spot.
For Chopping
Use a controlled rocking motion if your chef’s knife has a curved cutting edge. The tip can remain close to the board while the handle rises and falls through the food.
Not every knife or ingredient requires the same movement. Adjust the technique to the blade’s shape and the food’s firmness.
For Mincing Herbs and Garlic
Keep the ingredients gathered on the board and make short, controlled cuts. Avoid placing your guiding hand beneath the blade or holding ingredients loosely near the edge.
For additional practice, review the basics of chef’s knife cutting performance and sharpness, since a dull edge can make controlled cutting more difficult.
What Mistakes Should You Avoid When Holding a Chef’s Knife?
Most grip problems come from unnecessary tension, poor finger placement, or trying to cut faster than your technique allows. Correcting these habits can make food preparation more comfortable and predictable.
- Holding only the handle by habit: This can reduce direct blade control when you’re learning precise cuts.
- Pointing your index finger along the spine: Avoid this as a default chef’s knife grip; use the pinch grip or a secure handle grip instead.
- Squeezing too tightly: Excess tension can tire your hand and make small adjustments harder.
- Leaving your fingertips exposed: Keep your guiding hand curled inward and behind the blade’s path.
- Cutting on a slippery board: Place a damp towel beneath the board to help keep it stable.
- Using a dull or damaged knife: An edge that slips or needs excessive pressure makes controlled cutting more difficult.
- Looking away while cutting: Keep your attention on the food, blade, and guiding hand.
- Trying to catch a falling knife: Step back and let it fall rather than reaching for the blade.
Michigan State University Extension’s knife-handling safety guidance reinforces the importance of a secure grip and careful handling. These habits matter whether you’re preparing one tomato or a full meal.
How Can You Practice the Correct Knife Grip at Home?
You can develop a more natural grip through short, deliberate practice sessions. Focus on consistency before speed.
- Set up safely: Use a stable cutting board, dry hands, and a suitable chef’s knife.
- Check your grip: Position your thumb and index finger near the blade’s base, then wrap your other three fingers around the handle.
- Practice on a stable ingredient: A cucumber cut lengthwise or a halved onion provides a flat surface to work with.
- Move slowly: Make a few controlled slices while keeping your guiding hand curled.
- Check your comfort: Relax your hand between cuts and adjust your grip if you notice tension or discomfort.
- Repeat consistently: Build the same safe hand position into your regular food preparation routine.
As a practical self-check, pause after several cuts and inspect your hand position rather than judging your progress by speed. Your grip should remain stable, your wrist comfortable, and your fingertips tucked away throughout the task.
Stop if your hand becomes painful, numb, or difficult to control. A smaller or lighter knife may be a better fit than forcing your hand to adapt to an unsuitable handle.
Does Your Chef’s Knife Affect How You Hold It?
Yes. Blade length, handle shape, balance, and weight can all affect how comfortable a knife feels in your hand.
An 8-inch chef’s knife is a common general-purpose choice, but it isn’t the right size for everyone. A shorter 6-inch knife can feel easier to control when preparing smaller ingredients or working with limited counter space.
- Blade length: Choose a size you can control without awkward wrist movements.
- Handle shape: Look for a handle that feels secure without creating pressure points.
- Weight: A knife should feel balanced enough to guide without constant squeezing.
- Blade design: A bolster or unusually shaped handle may change where your fingers naturally rest.
If the knife consistently feels unstable, consider testing another size or handle design. Proper technique helps, but it cannot make every knife comfortable for every hand.
Once you have a suitable knife, protect its edge with sensible care and storage. Our guide to storing a chef’s knife safely explains how to keep the blade protected between uses.
Which Chef’s Knife Is Good for Learning Proper Grip?
 Save
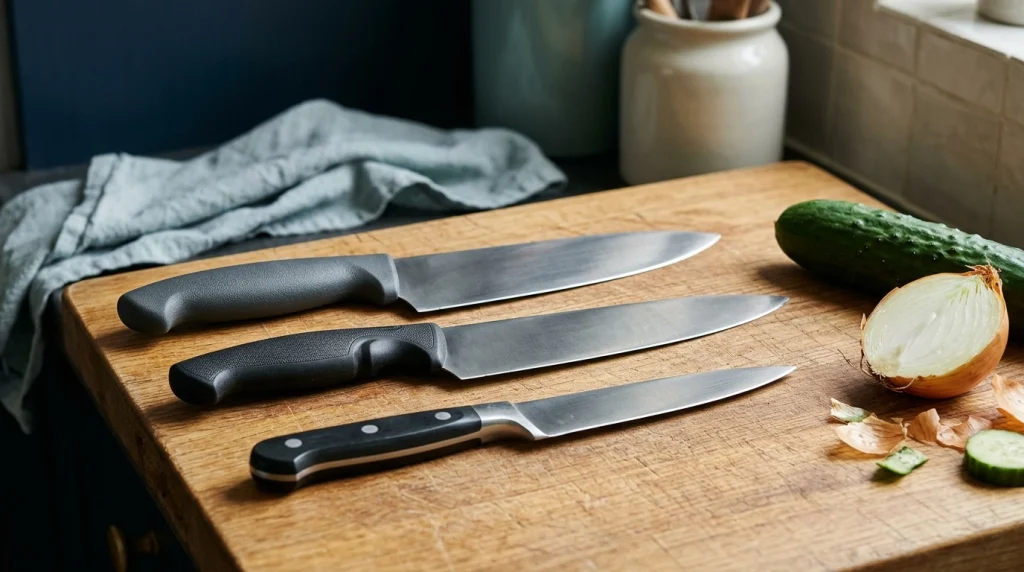
You don’t need an expensive knife to learn a reliable grip. Look for a comfortable handle, a blade that suits your hand, and a design that feels balanced during slow, controlled cuts.
If you’re considering a new knife, these established models represent different priorities. Check the current specifications and available sizes before buying.
🏆 BEST ALL-ROUND OPTION
Victorinox Fibrox Pro Chef’s Knife
★★★★☆
The Fibrox Pro is known for its practical, textured handle and everyday utility. It’s worth considering if you want a straightforward knife for practicing the pinch grip and general kitchen prep.
💰 CLASSIC BEGINNER CHOICE
Mercer Culinary Millennia Chef’s Knife
★★★★☆
The Millennia line offers practical kitchen knives with textured handles. It’s a useful option to compare if you want a simple everyday knife while learning controlled cuts and safe hand positioning.
🔪 ALTERNATIVE SIZE TO CONSIDER
WÜSTHOF Classic 6-Inch Chef’s Knife
★★★★☆
A shorter blade may feel easier to manage if a full-size chef’s knife seems bulky. Consider this model if you value a traditional handle and want to compare a compact option with an 8-inch knife.
These are product suggestions, not hands-on test results or verified current ratings. Compare the latest listing details, dimensions, handle material, and return policy, and choose the knife that feels comfortable and secure.
Frequently Asked Questions
Should I hold a chef’s knife with my index finger on top?
For a conventional chef’s knife, avoid extending your index finger along the top of the blade as your default grip. A pinch grip places your thumb and bent index finger on opposite flat sides near the blade’s base, while your other three fingers wrap around the handle.
Is the pinch grip safer than holding the handle?
The pinch grip can improve blade control, especially during precise slicing and dicing. However, no grip guarantees safety. A secure handle grip can also work, provided you control the blade, protect your guiding-hand fingertips, and avoid rushing.
How tight should I hold a chef’s knife?
Hold it firmly enough that the knife doesn’t slip or twist, but avoid squeezing so hard that your hand becomes tense. Your thumb and index finger should guide the blade while the remaining fingers secure the handle. If you experience pain or numbness, stop and reassess the fit.
Should beginners use a 6-inch or 8-inch chef’s knife?
Either size can work. An 8-inch blade offers more cutting length for larger ingredients, while a 6-inch knife may feel easier to control for smaller hands or compact workspaces. Choose based on comfort, balance, and your ability to guide the blade steadily.
How can I keep my fingers safe when chopping vegetables?
Use a claw grip with your guiding hand, keeping your fingertips curled inward and your thumb behind them. Stabilize food on a flat surface, keep the cutting board from sliding, and move slowly enough to maintain control. Never reach toward a falling knife.
Final Takeaway: Build a Comfortable, Controlled Grip
The best starting point for learning how to hold a chef’s knife is the pinch grip, combined with a curled guiding hand and deliberate cutting movements. These habits help you control the blade while keeping your fingertips away from the cutting edge.
Start slowly, choose a knife that fits your hand, and focus on consistent positioning rather than speed. With regular, careful practice, everyday chopping and slicing can become more comfortable and controlled.