How to Make a Cutting Board Without a Planer or Jointer
Quick Answer
You can make a cutting board without a planer or jointer by starting with straight, pre-surfaced hardwood. Arrange the pieces, glue their edges, clamp them evenly, sand the surface flat, and apply food-grade mineral oil. The easiest method uses wood already milled on all four sides. Choosing the best wood for a cutting board also helps create a durable finished project.
Six Quick Steps
- Choose straight hardwood: Buy untreated, kiln-dried maple, walnut, or cherry with accurately milled surfaces.
- Check the edges: Dry-fit every piece and confirm the joints close without visible gaps.
- Arrange the pattern: Position the strips and mark their order before gluing.
- Glue and clamp: Apply suitable waterproof wood glue and distribute clamp pressure evenly.
- Sand the surface: Remove minor uneven areas and progress through finer sandpaper grits.
- Apply the finish: Condition the clean, dry board with food-grade mineral oil.
Important Before Starting
- Start with flat lumber: Sanding cannot easily correct severely warped boards or badly fitted glue joints.
- Allow full curing: Follow the adhesive manufacturer’s directions before sanding or using the board.
Making a wooden cutting board sounds difficult when your workshop doesn’t have expensive machinery. Fortunately, a beginner-friendly design can eliminate the need for both a planer and a jointer.
I recommend starting with properly prepared hardwood instead of trying to correct rough lumber with sandpaper. This guide explains the complete process, including material selection, edge preparation, gluing, sanding, and finishing.
Can You Really Make a Cutting Board Without a Planer or Jointer?
Yes. A planer and jointer make lumber preparation easier, but neither machine is essential when your wood already has straight edges and flat faces.
A wooden cutting board is a stable food-preparation surface made from solid wood or securely joined hardwood pieces. Its cutting surface must be smooth, structurally sound, and suitable for repeated cleaning.
The biggest challenge without these machines is preparing the wood accurately. If the boards already fit together correctly, assembly becomes much simpler.
What Does Each Machine Normally Do?
- Jointer: Creates a flat reference face and straight, square edge on rough lumber.
- Thickness planer: Makes the opposite face parallel to a reference face and brings lumber to a consistent thickness.
- Random orbital sander: Smooths surfaces and corrects minor unevenness, but isn’t an efficient substitute for removing substantial thickness.
- Hand plane: Can flatten or straighten wood manually when properly sharpened and adjusted.
For a first project, I would spend the budget on better-prepared wood rather than machinery. Accurate materials make the remaining steps more manageable.
What Is the Easiest Method Without These Machines?
The easiest method is to use S4S hardwood, meaning lumber surfaced on all four sides. However, you should still inspect its straightness and squareness before assembly.
You can also use a single solid hardwood board if you want to avoid glue joints entirely. The best approach depends on your tools and desired appearance.
Cutting Board Construction Methods Compared
| Method | Main Tools | Difficulty | Best Use |
|---|---|---|---|
| Single S4S hardwood plank | Sanding block | Easy | Simplest first project |
| S4S edge-grain glue-up | Clamps, sander | Beginner to intermediate | Custom widths and patterns |
| Hand-plane preparation | Hand plane, square | Intermediate | Correcting imperfect edges |
| Router-sled flattening | Router, stable sled | Intermediate to advanced | Flattening larger uneven panels |
My preferred beginner approach is an edge-grain board made from accurately milled strips. It provides a traditional appearance without demanding an advanced workshop.
What Tools and Materials Do You Need?
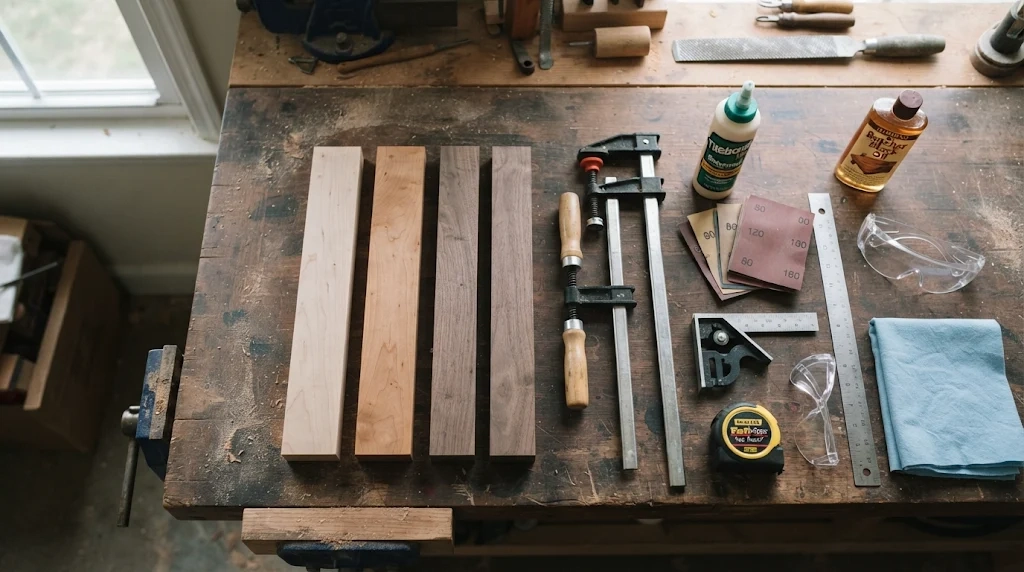
You don’t need a workshop full of machines. For the simplest design, basic measuring, clamping, and sanding equipment can handle the project.
Essential Materials
- Hardwood: Untreated maple, cherry, or walnut with flat faces and straight edges.
- Wood glue: A suitable waterproof adhesive, such as Titebond III Ultimate.
- Bar or parallel clamps: Enough to apply even pressure across the glue-up.
- Sandpaper: Common grits include 80, 120, 180, and 220.
- Food-grade mineral oil: For conditioning the completed cutting surface.
- Measuring tools: A tape measure, combination square, and straightedge.
- Clean cloths: For removing dust and applying the final finish.
- Safety equipment: Eye protection and suitable dust protection for sanding.
Helpful Optional Tools
- Random orbital sander with dust collection
- Hand plane for minor edge corrections
- Fine-tooth hand saw or suitable power saw
- Clamping cauls for panel alignment
- Router with an appropriately designed flattening sled
- Workbench with a stable, flat surface
If you don’t have a saw, ask your hardwood supplier to cut the pieces to length. This eliminates another preparation step.
What Wood Should You Use for a Cutting Board?
Choose a dense, reasonably stable hardwood with an appropriate grain structure. Hard maple, walnut, and cherry are common choices for kitchen cutting boards.
Buy from a reputable supplier and avoid lumber with unknown treatments. Never use pressure-treated wood or potentially contaminated reclaimed materials for a food-contact surface.
Recommended Hardwood Options
- Hard maple: A dense hardwood with a light appearance and good wear resistance.
- Black walnut: Offers dark brown coloring and an attractive natural grain.
- Cherry: A workable hardwood that develops a warmer color over time.
Look for straight pieces without significant twists, splits, or loose knots. Let the lumber adjust to your workshop conditions before starting.
Wood quality matters more than decorative complexity. Start with simple, reliable materials.
How to Make a Cutting Board Without a Planer or Jointer: Step by Step
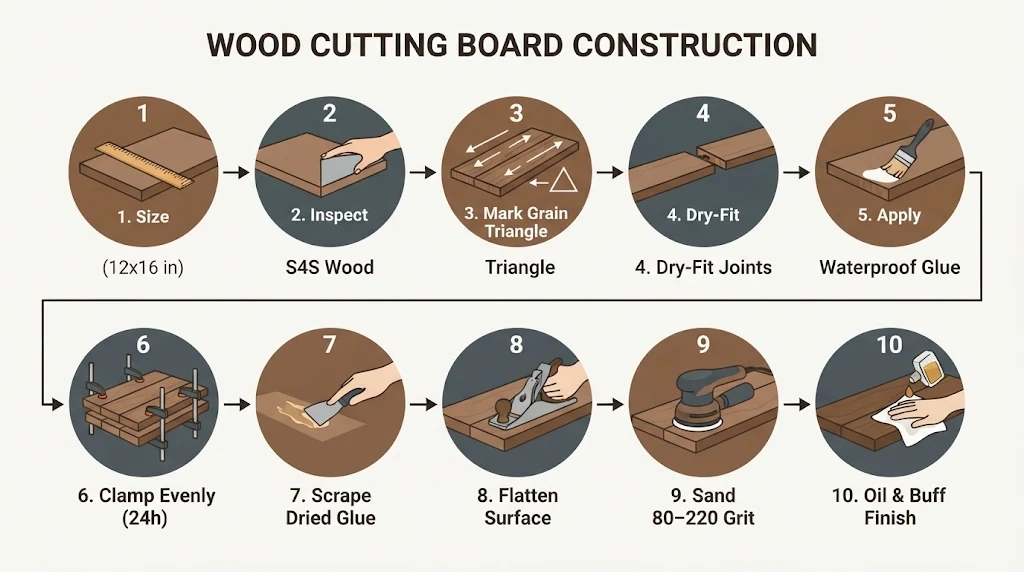
The following method creates an edge-grain cutting board from pre-milled lumber. You can complete most of the work using clamps, measuring tools, and sandpaper.
Step 1: Decide on Your Cutting Board Dimensions
Start with a practical size for everyday kitchen use. A finished board around 12 × 16 inches is a manageable beginner project.
A thickness of approximately 3/4 to 1 inch works for many household boards. Thicker wood adds weight and provides more material for future resurfacing.
For example, four strips measuring 3 inches wide and 16 inches long can produce a nominal 12 × 16-inch panel. This assumes the edges fit accurately and no additional trimming is needed.
If your design requires final trimming, begin with slightly oversized pieces. Keep every strip the same thickness.
Step 2: Inspect the Pre-Surfaced Wood
Lay every strip on a known flat workbench and check for rocking. Inspect both faces and every edge before applying glue.
Use a straightedge to identify noticeable gaps or curves. A combination square helps determine whether each mating edge is square to its face.
- Reject pieces with significant twists or cupping.
- Check that neighboring strips have matching thicknesses.
- Inspect the edges for saw marks and damaged corners.
- Replace or correct pieces that leave visible dry-fit gaps.
Don’t assume S4S wood is perfectly straight. Handling and storage can affect its shape after milling.
Step 3: Arrange the Wood Grain and Pattern
Place the hardwood strips side by side until you find a pattern you like. Pay attention to natural color changes and grain direction.
You can combine maple and walnut for contrast or use one species for a simpler appearance. Keep the arrangement manageable for your first project.
- Lay all strips with their intended cutting faces upward.
- Rearrange pieces until the colors and grain look balanced.
- Check the assembled width against your planned dimensions.
- Draw a light pencil triangle across the strips to preserve their order.
The triangle acts as an assembly reference. It prevents confusion when the pieces are separated for gluing.
Step 4: Check Every Joint Without Glue
Dry-fitting is one of the most important steps. Press neighboring strips together and inspect the seams under good lighting.
If you see gaps, don’t rely on clamp pressure to force the boards into shape. A joint should already fit closely before adding adhesive.
A hand plane can correct minor edge problems when used properly. Rockler also explains how to prepare accurate edge joints using hand planes.
If you don’t own suitable edge-preparation tools, exchange the imperfect strip or ask your lumber supplier to correct it. This is often easier for beginners.
Step 5: Apply Suitable Waterproof Wood Glue
Choose an adhesive appropriate for cutting board construction. Titebond III Ultimate is widely used because its manufacturer identifies it as suitable for indirect food contact.
It also offers a waterproof bond when applied correctly. You can review the Titebond manufacturer’s glue guidance before starting.
- Arrange the strips in their marked order.
- Apply a continuous, appropriate layer of glue to each mating edge.
- Spread the adhesive across the complete bonding surface.
- Bring the pieces together before the glue’s open time expires.
- Check alignment before tightening the clamps.
Don’t apply so much glue that the pieces float out of alignment. A thin, complete glue layer and accurate joints are more important than excess adhesive.
For additional assembly details, read this guide on how to glue up a cutting board.
Step 6: Clamp the Cutting Board Evenly
Position the clamps so their pressure pulls the strips together evenly. Alternate clamp positions where practical to reduce the tendency for the panel to bow.
Tighten gradually and inspect the panel after each adjustment. Excessive pressure can shift pieces and introduce unevenness.
- Use adequate support: Keep the panel on a stable, flat surface.
- Protect the wood: Use clamp pads to avoid dents.
- Maintain alignment: Use protected cauls if the strips begin shifting vertically.
- Inspect the seams: Look for consistent closure along each joint.
- Follow cure directions: Keep the assembly undisturbed for the adhesive’s required period.
Many wood glues permit removing clamps from unstressed joints after a relatively short period. For this project, allowing at least 24 hours before substantial machining is a conservative approach.
Always follow the specific adhesive’s instructions and account for temperature. Cooler conditions can slow curing.
Step 7: Remove Dried Glue Carefully
After the adhesive cures sufficiently, remove the clamps and inspect both faces. Look for dried glue beads and slightly raised joints.
Use a sharp scraper carefully to remove excess glue without gouging the wood. Avoid digging into the finished cutting surface.
Glue residue can interfere with an even appearance after oiling. Remove it before the final sanding stages.
Step 8: Flatten the Surface Without a Planer
For a well-aligned glue-up, a random orbital sander can remove small ridges and level minor transitions. Work across the entire surface rather than concentrating on one spot.
Begin with 80 or 100 grit only when necessary. For an already flat panel, starting around 120 grit removes less material.
- Secure the board against movement.
- Inspect its flatness using a straightedge.
- Sand evenly across the cutting surface.
- Check frequently for low spots or remaining ridges.
- Repeat on the opposite face if needed.
Keep the sander moving and avoid excessive pressure. Over-sanding a small area can create a noticeable depression.
A router flattening sled may help with significantly uneven surfaces, but it requires a stable setup and proper training. For a first project, using flatter lumber is safer and simpler.
Step 9: Sand Through Progressively Finer Grits
Once the board is sufficiently flat, remove coarse sanding marks with progressively finer abrasives. Each grit should remove the scratches from the previous stage.
- 80–100 grit: Correct noticeable surface irregularities on sufficiently thick wood.
- 120 grit: Refine the surface and remove coarse scratches.
- 180 grit: Improve smoothness across the cutting face.
- 220 grit: Create a comfortable final sanding finish.
You can lightly dampen the surface with clean water after an initial fine sanding. Let it dry completely before lightly sanding any raised fibers again.
Break the sharp outer edges using a sanding block. Gently rounded corners feel more comfortable during daily handling.
Step 10: Clean the Board and Apply a Food-Safe Finish
Remove all sanding dust before applying the finish. Use food-grade mineral oil intended for wooden food-contact surfaces.
Apply a thin, even coat over the cutting face, underside, and edges. Allow time for absorption, then wipe away excess oil.
- Vacuum or brush away sanding residue.
- Wipe every surface clean and ensure the board is completely dry.
- Apply food-grade mineral oil with a clean, lint-free cloth.
- Allow the oil to absorb for several hours or overnight.
- Buff away leftover oil until the surface no longer feels greasy.
- Inspect the finished board before preparing food.
Avoid ordinary cooking oils that may become rancid. Mineral oil conditions wood but does not make it waterproof.
For ongoing maintenance, see this complete guide on how to oil a wooden cutting board.
Can You Make a Cutting Board Without Any Power Tools?
Yes, especially if you purchase a single piece of hardwood already cut to its finished dimensions. Hand sanding and oiling can complete a simple cutting surface.
A glued edge-grain board is also possible with pre-cut, properly fitted strips and manual clamps. However, correcting bad joints without suitable tools can be frustrating.
Simple Hand-Tool Method
- Purchase a flat, untreated hardwood plank cut to the required dimensions.
- Inspect the faces and edges for damage.
- Use a sanding block to smooth the wood evenly.
- Round the sharp edges gently by hand.
- Remove sanding dust thoroughly.
- Apply food-grade mineral oil and remove the excess.
This approach avoids glue-up and minimizes equipment needs. The tradeoff is that a suitable wide, stable hardwood plank may cost more or be harder to find.
What Mistakes Should You Avoid?
Most beginner problems come from poor material preparation or rushed assembly. Preventing these issues is easier than correcting them afterward.
Common Mistakes and Practical Fixes
- Using warped lumber: Start with flat, dry hardwood instead of expecting sanding to remove major deformation.
- Ignoring edge gaps: Dry-fit every joint before applying adhesive.
- Applying uneven pressure: Tighten clamps gradually and monitor surface alignment.
- Removing clamps too early: Follow the manufacturer’s curing recommendations.
- Over-sanding one area: Work evenly across both cutting faces.
- Using an unsuitable finish: Choose products specifically appropriate for food-contact cutting boards.
- Leaving the board wet: Clean and dry the board completely after use.
I would prioritize straight glue joints over decorative grain patterns. A simple, flat board is more useful than an attractive panel with open seams.
How Do You Keep a Homemade Cutting Board From Warping?
Reduce warping risk by choosing stable, dry lumber and maintaining consistent moisture conditions. Proper storage and balanced cleaning also matter.
Wood expands and contracts as humidity changes. A cutting board may cup or twist when one face stays wetter than the other.
Ways to Reduce Warping
- Use kiln-dried hardwood from a reliable supplier.
- Allow the wood to acclimate before construction.
- Inspect lumber for existing twists and cupping.
- Condition all exposed surfaces appropriately.
- Wash and rinse the board without prolonged soaking.
- Stand the board on edge so both faces can dry.
- Avoid dishwashers, prolonged standing water, and excessive heat.
For deeper troubleshooting, explore how to prevent a cutting board from warping.
How Should You Clean and Maintain Your Homemade Cutting Board?
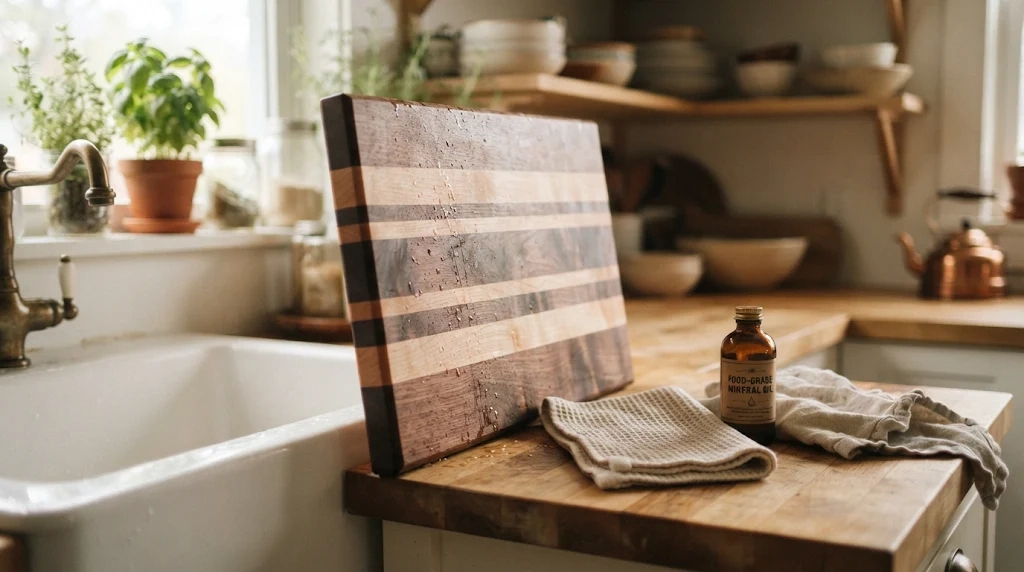
Clean the board after each use and allow it to dry completely. Good hygiene matters regardless of whether the board is handmade or purchased.
The University of Maine Cooperative Extension’s cutting board guidance covers suitable materials, cleaning, drying, and conditioning.
Recommended Maintenance Routine
- After use: Wash with dish soap and warm water.
- After washing: Rinse thoroughly and remove excess moisture.
- While drying: Allow airflow around both sides.
- When wood looks dry: Apply a suitable food-grade board conditioner.
- When scratched: Inspect whether light sanding can restore a cleanable surface.
- When deeply damaged: Replace boards with unsafe cracks, loose joints, or difficult-to-clean grooves.
Use separate boards for raw meat and foods that won’t undergo further cooking whenever practical. The USDA’s cross-contamination guidance explains why this separation matters.
If the surface eventually develops light wear, follow an appropriate cutting board refinishing process rather than immediately replacing a structurally sound board.
Helpful Tools for Making a Cutting Board Without a Planer
You don’t need to purchase every woodworking tool for this project. If you’re assembling a glued board, these three products address different parts of the process.
The ratings below are feature-based suitability assessments for this project, not verified customer ratings or hands-on test scores.
🏆 Best Essential Adhesive
Titebond III Ultimate Wood Glue
★★★★★
Project suitability: 4.8/5
This one-part wood glue provides a waterproof bond and is identified by its manufacturer as suitable for indirect food contact. I favor it for beginner cutting board projects because its working time helps with careful strip alignment.
🔧 Best for Panel Clamping
BESSEY K Body REVO KRE3524 Parallel Clamp
★★★★☆
Project suitability: 4.6/5
This 24-inch parallel clamp has large jaws designed to distribute pressure across woodworking assemblies. I recommend considering a matching set when holding several hardwood strips together during glue-up.
✨ Best for Surface Finishing
DEWALT DWE6423 Random Orbital Sander
★★★★☆
Project suitability: 4.5/5
This variable-speed, 5-inch random orbital sander is designed for controlled surface sanding. I consider it a useful option for smoothing glued panels, provided the wood is already reasonably flat.
Affiliate disclosure: As an Amazon Associate, we may earn from qualifying purchases. Product suitability scores reflect project fit, not customer review averages.
Frequently Asked Questions
1. Can I make a cutting board with only a sander?
Yes, if you begin with a single hardwood board already cut, flattened, and squared to the required dimensions. A sander can smooth the surface and soften the edges, but it cannot efficiently correct severely twisted lumber or produce accurately jointed edges for a multi-piece glue-up.
2. Is a planer necessary for making an edge-grain cutting board?
No. A thickness planer is useful for producing consistent thicknesses, but pre-surfaced hardwood can remove that requirement. Carefully inspect all pieces before gluing, maintain alignment during clamping, and use sanding only for minor surface corrections.
3. Can I use a hand plane instead of a jointer?
Yes. A properly sharpened and adjusted hand plane can straighten mating edges and prepare accurate glue joints. The process requires practice, a stable workholding setup, and frequent checking with a straightedge and square.
4. What is the easiest cutting board for beginners to make?
A single-piece hardwood board is the simplest option because it requires no glue joints. If you want a traditional striped design, an edge-grain cutting board using straight S4S hardwood strips is a practical beginner project.
5. How long should I wait before using my homemade cutting board?
Wait until the adhesive has cured according to its manufacturer’s instructions, the board has been fully finished, and excess conditioning oil has been removed. For many glue-up projects, allowing at least 24 hours before substantial sanding or machining is a cautious approach, though actual curing conditions vary.
Final Thoughts: Make Your First Cutting Board With Simple Tools
Learning how to make a cutting board without a planer or jointer is easier when you eliminate difficult lumber preparation. Straight, pre-surfaced hardwood helps you focus on accurate assembly and finishing.
Start with a simple design. Choose reliable materials, dry-fit carefully, clamp evenly, and sand patiently.
My recommendation is to build one basic edge-grain board before attempting a complicated end-grain pattern. Once you’re comfortable with the process, you can experiment with contrasting wood species and different board dimensions.
Ready to begin? Measure your kitchen workspace, choose suitable hardwood, and plan a board you can build with the tools you already own.