How to Glue Up a Cutting Board: Step-by-Step Guide
Quick Answer
To glue up a cutting board, prepare straight hardwood strips, arrange their grain, spread waterproof wood glue along every mating edge, and clamp the strips together with even pressure. Allow the glue to cure for at least 24 hours before final shaping and finishing. Titebond III is a popular choice because the manufacturer recommends it for cutting boards.
Quick Glue-Up Steps
- Prepare the wood: Cut dry hardwood strips and straighten their mating edges.
- Arrange the grain: Lay out the strips and mark their final positions.
- Apply wood glue: Spread a thin, continuous layer across each mating surface.
- Clamp evenly: Bring the strips together gradually without excessive force.
- Allow curing: Keep the assembly stable and avoid stressing the joints for at least 24 hours.
- Finish the board: Flatten, sand, clean, and apply a suitable food-contact finish.
Before You Start
- Best beginner project: A simple edge-grain cutting board.
- Recommended glue: Titebond III Ultimate Wood Glue.
- Most important factor: Flat, clean, accurately fitted joints.
Learning how to glue up a cutting board is one of the most useful skills for making wooden kitchen accessories. A carefully assembled board can provide a stable cutting surface and an attractive hardwood pattern.
The process looks simple, but small mistakes can leave gaps, uneven surfaces, or weak joints. In this guide, I’ll explain the complete process, including wood preparation, glue selection, clamping, curing, and finishing.
What Is a Cutting Board Glue-Up?
A cutting board glue-up is the process of joining multiple wooden strips or blocks into one larger panel using wood adhesive. The glued assembly eventually becomes the cutting surface.
Each piece must fit its neighboring piece accurately. Good edge preparation allows the adhesive to form a consistent bond without relying on excessive clamp pressure.
Edge-Grain vs. End-Grain Cutting Board Construction
Cutting boards commonly use either edge-grain or end-grain construction. The main difference is which part of the wood faces upward during cutting.
- Edge-grain boards: Long wooden strips are joined side by side, leaving their lengthwise grain visible on the cutting surface.
- End-grain boards: Short wooden blocks are arranged so their end grain forms the cutting surface.
- Face-grain boards: Wider faces of wooden planks form the cutting surface, usually with fewer glue joints.
I recommend edge-grain construction for a first project because it requires fewer cutting and reassembly stages. End-grain construction can create attractive patterns but demands additional precision.
What Materials and Tools Do You Need to Glue Up a Cutting Board?
 Save
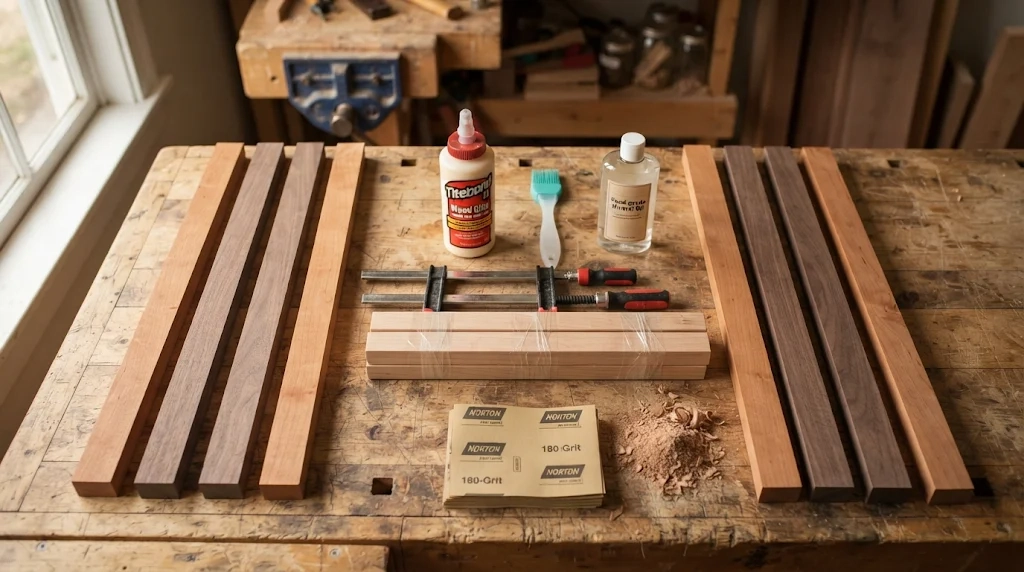
You need dry hardwood, a suitable adhesive, reliable clamps, and basic measuring tools. The quality of the mating edges matters more than buying expensive equipment.
Essential Materials
- Hardwood strips: Maple, walnut, or cherry are common choices for cutting boards.
- Waterproof wood glue: Choose an adhesive suitable for the intended kitchen application.
- Bar or parallel clamps: Use enough clamps to distribute pressure across the assembly.
- Glue spreader: A brush or plastic spreader helps cover the mating edges evenly.
- Protective cauls: Straight scrap boards can help keep the assembly flat.
- Parchment or protective sheet: Protects your workbench from excess adhesive.
- Sandpaper: Several grits help prepare the final surface.
- Food-grade mineral oil: Conditions the finished cutting board.
Optional Equipment
- Table saw with a suitable blade and safety equipment
- Jointer or properly set hand plane
- Thickness planer
- Random orbital sander
- Combination square and straightedge
- Digital moisture meter
- Clamping pads and additional alignment cauls
A jointer or hand plane makes accurate edge preparation easier. However, you can also use carefully prepared, straight lumber for a simple project.
What Is the Best Glue for a Cutting Board?
Titebond III Ultimate Wood Glue is a strong option for cutting boards because it meets ANSI/HPVA Type I waterproof-bond requirements. The manufacturer also identifies it as compliant for indirect food contact.
That distinction matters. Indirect food-contact compliance does not mean every adhesive can safely serve as an exposed food-contact surface.
Cutting Board Glue Comparison Table
| Adhesive | Water Resistance | Typical Open Time | Suitability |
|---|---|---|---|
| Titebond III Ultimate | ANSI Type I waterproof | 8–10 minutes | Preferred choice |
| Titebond II Premium | ANSI Type II water-resistant | 3–5 minutes | Suitable alternative |
| Titebond Original | Interior-use formulation | 4–6 minutes | Not my preference for wet kitchen use |
These times are approximate manufacturer values at standard working conditions. Temperature, humidity, wood species, and application method can affect actual working time.
Why Choose Titebond III?
- Waterproof bond: Meets the manufacturer’s stated Type I water-resistance specification.
- Longer assembly window: Gives you more time to align multiple strips.
- Indirect food-contact compliance: Specifically identified by the manufacturer for cutting board applications.
- Water cleanup: Fresh adhesive can be cleaned with water.
- Easy application: A squeeze bottle and spreader are sufficient for ordinary edge joints.
Waterproof glue does not make the whole cutting board waterproof. Wood still absorbs and releases moisture, which makes cleaning and drying practices important.
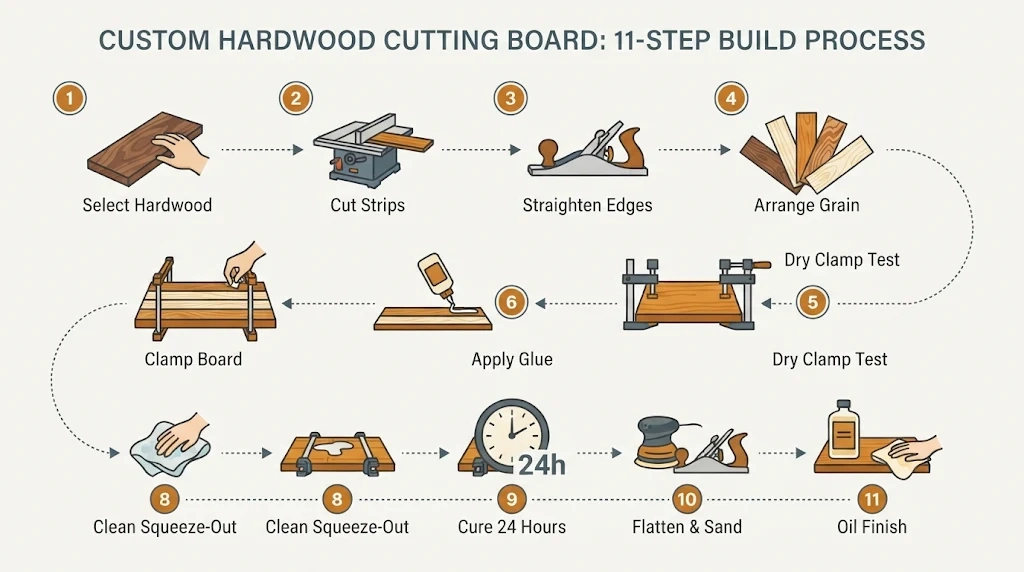
How Do You Glue Up a Cutting Board Step by Step?
 Save
The best glue-up begins before opening the adhesive bottle. First prepare the wood, confirm your layout, and arrange every clamp within reach.
Step 1: Select Suitable Hardwood
Start with dry, stable hardwood intended for woodworking. Maple, walnut, and cherry are practical options because they are commonly used for wooden cutting boards.
Look for boards without significant twisting, large cracks, loose knots, or obvious contamination. Avoid unknown reclaimed wood that might contain unsafe finishes or chemical treatments.
- Use wood from a reliable supplier.
- Choose pieces with similar moisture conditions.
- Inspect for splits and structural defects.
- Avoid pressure-treated lumber.
- Allow lumber to acclimate to your workshop conditions.
Step 2: Cut the Wood Into Strips
Cut the hardwood into strips according to your planned board dimensions. For a beginner project, a finished board around 12 by 18 inches is a manageable example.
The strip width depends on the intended appearance and available lumber. Keep enough extra thickness for flattening and final sanding.
Use your saw’s guards, push sticks, and recommended operating procedures. Never cut narrow stock freehand against a table saw fence.
Step 3: Straighten and Square the Edges
Accurate edges are essential because glue cannot reliably compensate for large gaps. Joint each mating edge so adjacent strips fit together without rocking.
A properly adjusted jointer or hand plane can create the needed straightness. Confirm that the edges are square to the board faces where the design requires it.
- Place neighboring strips together without glue.
- Check the seam against a bright background.
- Inspect for gaps at the ends and center.
- Correct uneven edges before proceeding.
- Remove loose dust from every mating surface.
Do not try to close a large gap with extra glue or clamp force. That approach can create stress inside the finished board.
Step 4: Arrange the Wood Grain
Lay every strip on the workbench in its intended position. Adjust the arrangement until the grain pattern and colors look balanced.
Alternating growth-ring orientation can be useful in some layouts, but it does not guarantee a flat board. Stable lumber and accurate milling remain more important.
Draw a light diagonal pencil line across the strips. This reference mark makes it easier to restore the arrangement during glue application.
Step 5: Perform a Dry Clamp Test
A dry clamp test means assembling the entire board without adhesive. It reveals potential alignment problems while you still have time to make corrections.
Place the strips across the clamps and tighten gently. Check the top surface, end alignment, and overall width.
- Confirm that the clamps open wide enough.
- Position clamps along the board length.
- Alternate clamp locations above and below where practical.
- Keep protective pads or cauls ready.
- Check that every strip remains aligned.
As a practical starting layout, three clamps often work well for an approximately 18-inch-long board. The number depends on your stock and actual joint behavior.
Step 6: Apply an Even Layer of Wood Glue
Spread a thin, continuous adhesive film along the mating edges. Follow the glue manufacturer’s instructions for coverage, temperature, and assembly timing.
I prefer planning the entire glue-up before dispensing anything. A few minutes spent organizing the strips can prevent rushed alignment later.
- Lay the strips out in their marked order.
- Apply glue to the appropriate mating edges.
- Spread the adhesive evenly with a clean brush.
- Check for uncovered or dry areas.
- Bring the strips together promptly.
More glue does not automatically create a stronger joint. The goal is complete coverage without unnecessary waste or excessive squeeze-out.
Step 7: Clamp the Cutting Board Together
Position the strips on the prepared clamps and bring the joints together gradually. Start with light pressure and check alignment before further tightening.
Apply enough force to close properly fitted seams. Excessive pressure can distort the assembly or damage the wood.
- Start gently: Bring the strips together without sudden force.
- Check alignment: Keep neighboring surfaces as level as possible.
- Use cauls: Add protected straight cauls if the strips begin lifting.
- Adjust pressure: Tighten individual clamps gradually.
- Inspect seams: Look for continuous contact across the joints.
Protective cauls should be covered with suitable release material to prevent accidental adhesion. Keep clamps away from the final cutting surface whenever possible.
Step 8: Remove Excess Glue
Some adhesive squeeze-out is normal when the joints close properly. Clean it according to the adhesive manufacturer’s recommendations.
For fresh water-based glue, a carefully used damp cloth may help. However, excess water can spread glue into wood pores or raise surface fibers.
Another approach is to let the squeeze-out reach a suitable scraping stage. Use a scraper carefully without damaging the wood.
Step 9: Allow the Glue to Cure
Clamping time and full curing time are different. A board may become firm enough to remove from clamps before it is ready for machining or regular use.
Titebond recommends approximately 30–60 minutes of clamping for many unstressed joints, with longer periods for stressed joints. It also recommends avoiding joint stress for at least 24 hours.
For a cutting board project, leaving the assembly undisturbed overnight is a practical approach. Wait at least 24 hours before demanding operations, unless the specific adhesive requires longer.
Step 10: Flatten and Sand the Board
After the glue has cured, remove remaining adhesive and inspect the panel. Flatten the board using equipment appropriate for its construction.
A planer may be suitable for some edge-grain boards when used according to the machine’s instructions. Do not assume an end-grain board can safely pass through a conventional thickness planer.
- Remove hardened glue residue.
- Inspect the seams for visible gaps.
- Flatten both cutting surfaces evenly.
- Start sanding at a grit appropriate for the surface.
- Progress through finer grits, commonly ending near 180–220.
- Ease sharp corners and remove all sanding dust.
If you need to restore the surface later, follow this guide to refinishing a cutting board.
Step 11: Apply a Suitable Cutting Board Finish
Once sanding is complete, clean the wood and let it dry. Apply food-grade mineral oil or another finish specifically suitable for the intended cutting-board application.
Spread the oil over both faces and all exposed edges. Allow absorption according to the product instructions, then wipe away excess oil.
Mineral oil conditions the wood but does not sanitize the surface. Regular washing and drying remain necessary.
How Much Glue and Clamp Pressure Should You Use?
Use enough adhesive to coat the entire mating surface without leaving dry patches. A thin, consistent film is generally more useful than thick, uneven beads.
Clamp pressure should close well-fitted joints without crushing the wood. There is no universal hand-tightening amount that works for every cutting board.
| Condition | What It Suggests | Recommended Action |
|---|---|---|
| Visible dry glue areas | Incomplete coverage | Spread adhesive more evenly |
| Large joint gaps | Poor edge fit | Rejoint the edges before gluing |
| Excessive squeezing and slipping | Possible excess adhesive or pressure | Recheck coverage and clamp gradually |
| Even seam contact | Joint is closing consistently | Maintain stable, even pressure |
Clamps cannot replace accurate woodworking. Fix poor contact before using adhesive rather than relying on extreme tightening force.
How Long Should a Cutting Board Stay Clamped?
For Titebond III, many unstressed joints require approximately 30–60 minutes of clamping under suitable conditions. However, waiting longer before removing clamps can provide additional peace of mind.
The manufacturer advises avoiding stress on new joints for at least 24 hours. Lower temperatures, difficult assemblies, and other adhesive formulations may require different schedules.
Practical Glue-Up Timeline
| Stage | Planning Allowance | Important Note |
|---|---|---|
| Dry assembly | 10–20 minutes | Estimated preparation time |
| Glue spreading | Within adhesive working time | Titebond III open time is about 8–10 minutes |
| Initial clamping | 30–60 minutes or longer | Follow manufacturer guidance for joint conditions |
| Avoiding joint stress | At least 24 hours | Longer if the adhesive instructions require it |
These allowances are planning guidelines, not guaranteed curing times for every workshop. Always prioritize the product instructions printed on your adhesive container.
What Are the Most Common Cutting Board Glue-Up Mistakes?
 Save
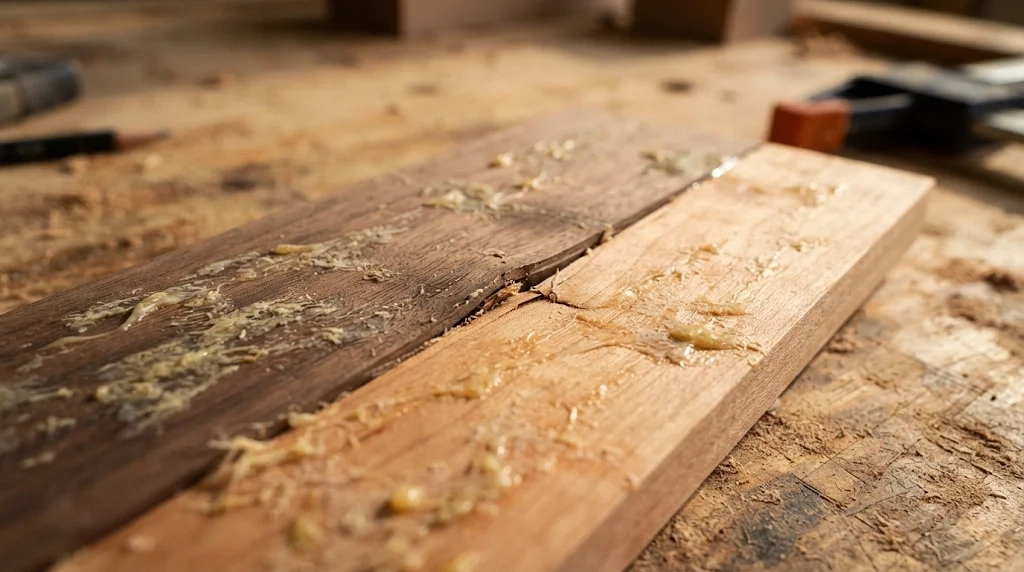
Most glue-up failures begin with poor preparation or rushed assembly. Preventing these problems is easier than correcting them after the adhesive hardens.
1. Gluing Uneven Edges
Uneven edges create gaps that adhesive cannot reliably bridge. Joint the strips accurately and test their fit before applying glue.
2. Using the Wrong Adhesive
Not every woodworking adhesive suits repeated kitchen moisture exposure. Select a product with appropriate moisture resistance and documented suitability for cutting boards.
3. Applying Excessive Clamp Pressure
Overtightening can cause strips to shift or deform. Tighten the clamps progressively while monitoring the assembly.
4. Ignoring Wood Moisture
Wood changes dimensions as its moisture content changes. Joining lumber with significantly different moisture conditions can increase the risk of movement.
5. Rushing the Curing Process
Early sanding, planing, or aggressive handling can stress new joints. Follow the adhesive’s curing requirements before further machining.
6. Leaving Glue Residue on the Surface
Dried adhesive can block oil absorption and create blotchy-looking patches. Inspect the board under good lighting before applying the final finish.
Can You Glue an End-Grain Cutting Board the Same Way?
An end-grain cutting board requires a more involved process than a basic edge-grain board. Makers often glue a long-grain panel first, then crosscut, rotate, and reassemble the sections.
The second glue-up must be carefully aligned. Accurate cutting and flat mating surfaces help create a consistent checkerboard-style pattern.
Basic End-Grain Construction Sequence
- Build a straight, stable long-grain panel.
- Allow the first adhesive assembly to cure.
- Flatten the panel safely.
- Crosscut the panel into appropriately sized sections.
- Rotate the sections so the end grain faces upward.
- Arrange the desired pattern.
- Glue the prepared mating faces together.
- Clamp, cure, and flatten using a suitable safe method.
End-grain construction requires special attention during flattening. Conventional thickness planers can cause dangerous tear-out or kickback when used on end-grain boards.
For your first woodworking project, I suggest mastering a long-grain panel before attempting a complicated end-grain pattern.
How Do You Prevent Cutting Board Glue Joints From Separating?
Strong glue joints depend on accurately prepared wood, suitable adhesive, proper curing, and consistent maintenance. Even a well-built cutting board needs protection from prolonged moisture exposure.
- Use dry, stable hardwood.
- Prepare clean, close-fitting mating edges.
- Follow the adhesive manufacturer’s application instructions.
- Allow adequate curing before machining.
- Wash the finished board promptly after use.
- Never leave a laminated wooden board soaking in water.
- Dry the board thoroughly before storage.
- Condition the wood when its surface appears dry.
The USDA cutting board guidance emphasizes proper cleaning and monitoring surfaces for wear. Boards with excessive damage or hard-to-clean grooves may need replacement.
Can You Repair a Separating Glue Joint?
A small visible seam is not automatically a safe or repairable joint. Stop using a board for food preparation when a seam opens or traps moisture and residue.
A repair may require completely separating the affected pieces, removing old adhesive, and preparing fresh mating surfaces. Smearing glue into an existing narrow crack is not a reliable structural repair.
Replace boards with extensive cracking, suspected deep contamination, or widespread joint failure. Food safety matters more than preserving damaged wood.
How Should You Clean and Maintain a Glued Cutting Board?
Wash the finished board with mild dish soap and warm water after use. Rinse it thoroughly and dry it promptly.
Keep laminated wooden cutting boards out of the dishwasher unless their manufacturer specifically states otherwise. The USDA warns against dishwasher cleaning for wood laminates.
Recommended Maintenance Habits
- After cutting: Wash the board before preparing another food category.
- After washing: Dry both faces and allow adequate airflow.
- When the wood looks dry: Apply an appropriate cutting-board conditioner.
- During inspections: Check for loose seams, deep grooves, and excessive wear.
- When damage becomes serious: Replace the board rather than continuing to use an unsafe surface.
The USDA also recommends using separate boards for fresh produce and raw meat, poultry, or seafood where possible. Review its cross-contamination prevention guidance.
For routine conditioning, see this bamboo cutting board oiling guide. Bamboo boards differ from solid hardwood boards, so check the manufacturer’s instructions before treating either surface.
The finished cutting surface also affects knife wear. Learn more in this guide explaining whether wooden cutting boards dull knives.
Recommended Tools for Cutting Board Glue-Ups
A successful project doesn’t require a large collection of specialist tools. I would prioritize a dependable adhesive, accurate clamps, and a reusable glue spreader.
The following recommendations reflect specifications and intended uses, not personal hands-on testing. Suitability scores are editorial assessments rather than customer review averages.
🏆 Best Cutting Board Glue
Titebond III Ultimate Wood Glue
★★★★★
Editorial suitability: 4.9/5
This waterproof wood adhesive offers an approximate 8–10-minute open assembly time and documented indirect food-contact compliance. It’s my first recommendation for a typical hardwood cutting board because its working time gives beginners more room to align their strips.
🔧 Best Precision Clamp
BESSEY K Body REVO KRE3524 Parallel Clamp
★★★★☆
Editorial suitability: 4.7/5
The KRE3524 provides a 24-inch clamping capacity, large parallel jaws, and a nominal 1,700-pound clamping force rating. I favor this type of clamp for panel alignment because its broad jaws help distribute pressure across the wood.
💰 Best Simple Glue Spreader
Rockler Silicone Glue Brush
★★★★☆
Editorial suitability: 4.6/5
This seven-inch reusable brush features silicone bristles and a tapered tip for applying woodworking adhesive. Its easy-clean design makes it a practical accessory for spreading glue along narrow hardwood edges.
Frequently Asked Questions
1. Can You Use Regular Wood Glue for a Cutting Board?
Some wood glues are suitable, but ordinary interior glue is not my preferred choice for a kitchen cutting board. Choose an adhesive with appropriate moisture resistance and documented indirect food-contact suitability. Titebond III is a commonly recommended option because its manufacturer specifically identifies cutting boards as an intended application.
2. Do You Need Dowels or Biscuits When Gluing a Cutting Board?
Dowels and biscuits are generally unnecessary for a simple edge-grain cutting board with accurately prepared joints. Properly fitted long-grain glue joints can provide strong connections. Alignment aids may help in some projects, but they do not replace careful edge preparation or adequate adhesive curing.
3. How Many Clamps Do You Need for a Cutting Board?
The number of clamps depends on the board’s length, thickness, and joint quality. Three clamps can be a reasonable starting point for a small, approximately 18-inch-long edge-grain board. Use additional clamps when necessary to distribute pressure evenly and prevent gaps.
4. Can You Glue a Cutting Board Without a Planer?
Yes. You can build a cutting board without owning a thickness planer if you begin with accurately prepared lumber. A hand plane, sanding block, or suitable sander can help with final flattening. However, substantial unevenness may require more specialized tools or professional surfacing.
5. How Long After Gluing Can You Use a Cutting Board?
Allow the adhesive to cure according to its manufacturer’s directions before sanding, finishing, and using the board. For Titebond III, avoiding joint stress for at least 24 hours is recommended. Any cutting-board finish must also complete its required absorption or curing period before food preparation.
Final Thoughts: Build Strong Cutting Board Glue Joints
Knowing how to glue up a cutting board comes down to three essentials: accurate wood preparation, suitable adhesive, and controlled clamping. Take care of those fundamentals, and the rest of the construction becomes much easier.
Start with a simple edge-grain design before exploring decorative end-grain patterns. Give every joint enough time to cure, and maintain the finished board with proper cleaning and conditioning.
Ready to begin? Prepare your hardwood strips, complete a dry assembly, and check every seam before opening the glue bottle. That preparation is one of the most valuable steps in the entire project.