How to Hone a Chef Knife: A Step-by-Step Guide for a Sharper Edge
Quick Answer
To hone a chef knife, hold a suitable honing rod firmly with its tip resting on a stable, nonslip surface. Place the knife’s edge against the rod at the angle recommended for your blade, usually around 15–20 degrees from the rod, then glide the blade from heel to tip using light pressure. Alternate sides for three to five controlled passes per side, wipe the blade clean, and test it carefully; if it remains dull, sharpen it instead.
How to Hone a Chef Knife Safely
- Prepare the workspace: Place a suitable honing rod vertically on a stable cutting board or nonslip towel.
- Find the angle: Match the manufacturer’s recommended edge angle instead of forcing every knife to the same angle.
- Start at the heel: Position the back of the cutting edge near the top of the rod.
- Glide gently: Draw the blade down the rod while moving from heel to tip, keeping your fingers away from the cutting edge.
- Alternate sides: Use a few light, controlled strokes on each side rather than pressing hard or moving quickly.
- Check the result: Wipe the blade and test it on a tomato or sheet of paper, keeping your hands clear of the edge.
One Important Distinction
- Honing: Maintains an existing edge by correcting minor edge misalignment.
- Sharpening: Removes material to create a new cutting edge when honing no longer works.
A chef knife can feel frustratingly dull even when its blade looks perfectly fine. Sometimes, the edge simply needs realignment rather than a complete sharpening.
I’m Michael, and this guide explains how to hone a chef knife with a honing rod, choose the right angle, avoid common mistakes, and recognize when your knife needs more than routine maintenance. I’ll also cover the tools worth considering and how to keep your blade performing well in everyday cooking.
What Does It Mean to Hone a Chef Knife?
Honing a chef knife is the process of maintaining its cutting edge by correcting minor bends or misalignment along the edge. A honing rod helps restore cutting performance when a blade has become less effective through ordinary use.
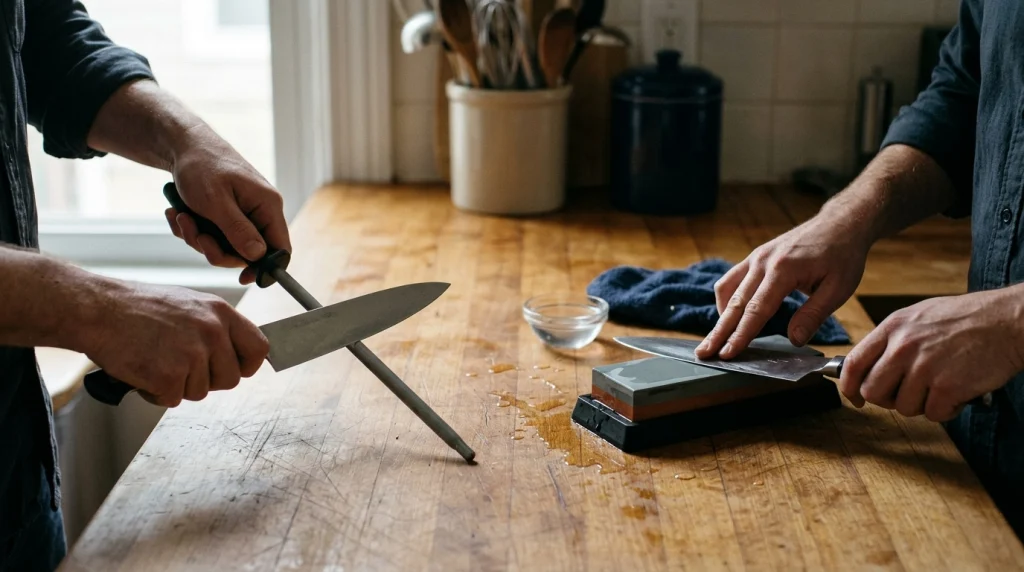
Honing is not the same as sharpening. Traditional honing steels mainly realign an edge, while abrasive tools such as whetstones remove metal to form a fresh edge.
Even a well-made knife gradually loses cutting performance as it slices vegetables, meat, herbs, and other ingredients. Regular honing can help maintain the edge between sharpening sessions.
How can you tell when your knife needs honing?
A knife that needs honing often struggles with delicate foods before it becomes completely dull. Look for these practical signs:
- Tomato skin resists the blade: The knife slides across the skin instead of beginning a clean cut.
- Herbs bruise during chopping: The blade crushes delicate leaves instead of slicing through them cleanly.
- Onions require extra pressure: You notice more resistance when cutting through the outer layers.
- Slicing feels inconsistent: The knife cuts well in one section of the blade but struggles in another.
These signs suggest an edge problem, but they don’t prove honing will fix it. If the knife remains dull after a few careful passes, it probably needs sharpening or professional inspection.
What Is the Difference Between Honing and Sharpening?
 Save
Honing maintains a usable edge, while sharpening rebuilds a worn cutting edge by removing a small amount of metal. Understanding the difference prevents unnecessary sharpening and helps you choose the correct tool.
| Feature | Honing | Sharpening |
|---|---|---|
| Main purpose | Maintain the existing edge | Restore a worn or damaged edge |
| Material removal | Little or none with a traditional steel | Removes a small amount of metal |
| Common tools | Traditional honing steel or suitable ceramic rod | Whetstone, suitable abrasive sharpener, or professional service |
| Typical frequency | Before cooking or every few uses, as needed | When honing no longer restores performance |
| Best indicator | The edge has lost some bite but remains serviceable | The knife still struggles after correct honing |
For everyday home cooking, honing can reduce how often you need to sharpen a knife. It cannot repair a chipped edge, correct serious damage, or replace sharpening indefinitely.
Manufacturer guidance varies by knife, so follow the instructions for your particular blade. For a useful overview, consult Victorinox’s official knife-care resources.
What Angle Should You Use to Hone a Chef Knife?
Many chef knives work well with a honing angle around 15–20 degrees, but the correct angle depends on the blade’s original edge geometry and the manufacturer’s guidance. A consistent angle matters more than chasing an exact number that doesn’t suit your knife.
Angle terminology can be confusing because some instructions describe the angle between the blade and rod, while others describe the cutting-edge angle relative to the blade’s centerline. Check which measurement the manufacturer uses before following a specific number.
How do you find the correct angle?
- Check the manufacturer’s instructions: Start here, especially for premium or Japanese knives.
- Use a visual reference: If your knife calls for approximately 20 degrees against the rod, begin by imagining a right angle and dividing it into smaller sections.
- Keep the wrist steady: Avoid changing the blade angle halfway through each stroke.
- Practice slowly: Consistent, gentle movement is more useful than speed.
Some Japanese knives have harder steel and narrower edge angles than many Western-style knives. A coarse or unsuitable rod can damage a delicate edge, so choose a honing tool compatible with your knife.
How to Hone a Chef Knife With a Honing Rod
The safest way to learn is to keep the rod stationary and move the knife slowly. You don’t need dramatic, fast strokes to maintain a good edge.
Step 1: Prepare a stable work surface
Place the tip of the honing rod on a nonslip cutting board or a securely positioned folded towel. Check that the rod cannot slide when you apply light pressure.
Dry your hands and clear away food scraps, loose utensils, and other distractions. Keep children and other people away from the immediate work area while handling the exposed blade.
Step 2: Hold the knife and rod correctly
Grip the honing rod by its handle and keep your fingers behind the guard, if present. Hold the knife firmly by its handle, with your thumb and fingers away from the cutting edge.
Resting the rod vertically on a stable surface makes it easier to control the angle. Beginners should avoid holding the rod in midair until they have developed reliable technique.
Step 3: Position the heel of the blade
Place the heel, or rear section of the cutting edge near the handle, against the upper portion of the rod. Tilt the blade to the recommended angle for your knife.
Use light contact rather than pressing the blade forcefully against the rod. Excess pressure makes the movement harder to control and can damage the edge.
Step 4: Glide from heel to tip
Move the blade down the rod while guiding the cutting edge from heel to tip in one controlled, sweeping motion. The full cutting edge should pass across the rod without twisting your wrist.
Keep the motion slow enough to maintain control throughout the stroke. Never try to imitate the fast knife movements often shown in cooking demonstrations.
Step 5: Alternate sides of the knife
Turn the knife so the opposite side of its edge contacts the rod, then repeat the same controlled movement. Alternate sides rather than completing a large number of strokes on one side first.
Start with three to five light passes per side. A knife that needs only minor maintenance may require fewer strokes, and more passes won’t automatically produce a better result.
Step 6: Clean and test the edge
Wipe the blade carefully with a clean cloth, moving away from the cutting edge, and wash it according to the manufacturer’s care instructions. Dry it thoroughly before putting it away.
Test the knife by making a controlled slice through a tomato or another suitable food on a cutting board. Alternatively, try cutting a sheet of paper while keeping your fingers clear of the blade’s path.
If the knife still tears, slips, or struggles, stop honing. It may need abrasive sharpening rather than more passes along the rod.
Which Honing Rod Is Best for a Chef Knife?
 Save
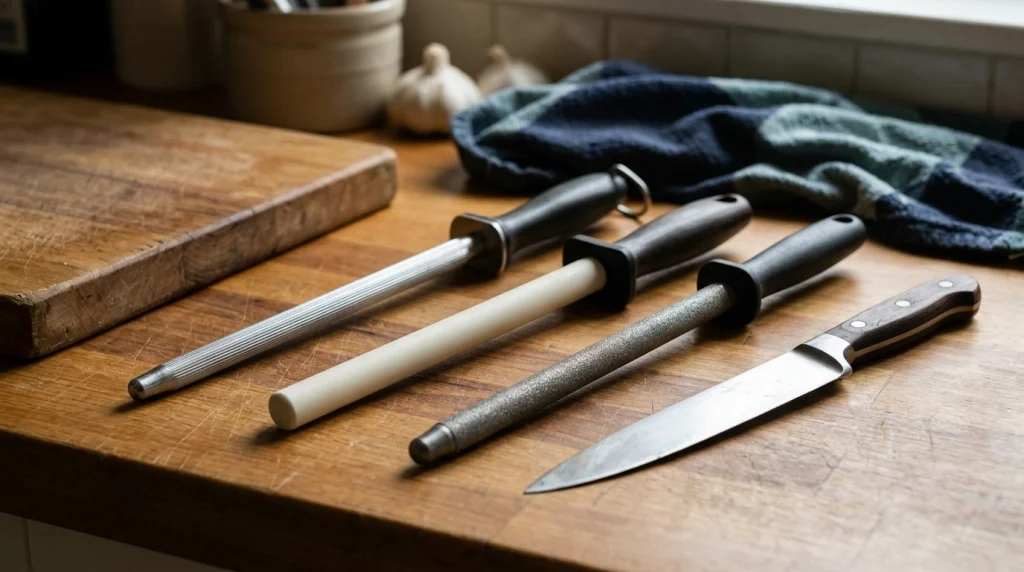
The right honing rod depends on your knife’s steel, hardness, edge geometry, and maintenance needs. A traditional steel rod, ceramic rod, and diamond-coated rod don’t behave exactly alike.
| Rod type | Best suited to | Important consideration |
|---|---|---|
| Traditional steel | Routine maintenance of compatible Western-style knives | Check compatibility with the knife’s hardness and edge |
| Ceramic | Fine maintenance for many harder or thinner-edged knives | Ceramic is abrasive and can chip if dropped |
| Diamond-coated | Light abrasive work when the manufacturer recommends it | Removes material more aggressively than a traditional steel |
For a first honing rod, look for a model long enough to accommodate your chef knife comfortably, with a secure handle and a stable grip. A rod around 10–12 inches long is often practical for an 8-inch chef knife, although the usable rod length and your knife’s dimensions matter.
For detailed guidance on steel compatibility and blade maintenance, you can also visit ZWILLING’s official knife-care resources.
How Often Should You Hone a Chef Knife?
Hone your chef knife when its cutting performance begins to decline, rather than following a rigid schedule. Depending on the knife, cutting board, ingredients, and cooking frequency, that might mean before a cooking session or every few uses.
A home cook preparing vegetables daily may need more frequent maintenance than someone who uses a chef knife once a week. Your knife’s performance is the best guide.
- Before regular meal preparation: Check whether the edge still cuts cleanly and hone if needed.
- After demanding prep: Inspect the edge after extensive chopping or cutting firm ingredients.
- After sharpening: Follow the sharpener or knife manufacturer’s guidance for any finishing or honing step.
- When performance doesn’t improve: Stop repeating the same maintenance routine and consider sharpening.
Avoid treating honing as a substitute for all other knife care. Using an appropriate cutting board, storing the blade safely, and cleaning it properly also help preserve its edge.
What Mistakes Should You Avoid When Honing a Chef Knife?
Most honing problems come from inconsistent angles, excessive force, or using a tool that doesn’t suit the knife. A careful routine reduces the risk of damaging the blade or losing control of the knife.
- Using too much pressure: Let the blade glide with light, controlled contact instead of forcing it against the rod.
- Moving too quickly: Speed makes it harder to maintain the angle and control the cutting edge.
- Changing the angle repeatedly: Keep the same angle throughout each stroke and follow the knife manufacturer’s instructions.
- Using an incompatible rod: Check whether your knife’s steel and edge can tolerate the rod’s surface.
- Honing a serrated blade like a straight edge: Serrated knives require specialized maintenance, often from a suitable sharpener or professional.
- Ignoring chips or serious damage: A honing rod won’t restore missing metal or correct a badly damaged edge.
- Leaving the blade dirty: Wipe away residue after honing and wash and dry the knife safely.
One useful habit is to stop as soon as the knife cuts well again. Repeated extra strokes are unnecessary when the edge already performs as it should.
What Should You Do if Honing Doesn’t Make the Knife Sharp?
If your chef knife still struggles after a few correct passes, it probably needs sharpening rather than further honing. A worn edge requires abrasive material to create a fresh cutting surface.
Choose a sharpening method that matches your skill level and the knife manufacturer’s guidance. A whetstone offers control but requires practice, while a compatible guided sharpener or professional service may be easier for beginners.
- Minor loss of cutting bite: Try appropriate honing first.
- Persistent dullness: Use a suitable sharpening method or consult a professional.
- Visible chips or a bent tip: Seek appropriate repair instead of trying to fix serious damage with a honing rod.
- Expensive or delicate Japanese knife: Check the maker’s instructions before choosing an abrasive tool.
As of 2026, the practical rule remains simple: hone to maintain an edge, sharpen to restore one, and choose tools that suit the knife. Manufacturer instructions should take priority over generic angle recommendations.
How Can You Keep a Chef Knife Sharp Between Honing Sessions?
Good storage and cutting habits help preserve the edge, reducing how often you need maintenance. A sharp knife also works best when you use it on suitable surfaces and keep it clean.
- Choose the right board: Wood or suitable plastic is generally preferable to glass, stone, or ceramic surfaces.
- Store the blade safely: Use a knife block, blade guard, or properly installed magnetic holder.
- Wash carefully: Hand-wash when recommended and dry the knife promptly.
- Avoid hard tasks: Don’t use a chef knife to pry, twist through bones, or cut frozen foods unless the knife is specifically designed for the task.
- Inspect regularly: Check for chips, corrosion, loose handles, or other damage before using the knife.
For additional safe-handling advice, the USDA Food Safety and Inspection Service provides general food-preparation guidance. Remember that safe handling also depends on a stable board, controlled movements, and keeping your fingers away from the cutting edge.
Which Honing Tools Are Worth Considering?
If you’re ready to choose a honing tool, focus on compatibility, ease of control, and the type of maintenance your knife needs. These three options cover different priorities without assuming that one rod suits every chef knife.
🏆 BEST FOR EVERYDAY MAINTENANCE
WÜSTHOF Classic Honing Steel
★★★★☆
A traditional steel honing rod designed for routine edge maintenance on compatible knives. I’d consider this style for a Western chef knife when the manufacturer confirms that a steel rod suits its blade.
🎯 BEST FOR FINE EDGE CARE
MAC Ceramic Honing Rod
★★★★☆
A ceramic rod offers a finer abrasive alternative to many conventional steel rods. I’d consider it for a compatible kitchen knife that benefits from gentle edge maintenance, while handling the brittle ceramic carefully.
💰 BEST FOR BEGINNERS
Victorinox Swiss Classic Honing Steel
★★★★☆
A conventional honing steel is a straightforward option for learning controlled strokes and regular maintenance. I’d prioritize a comfortable handle and adequate rod length over extra features or a premium finish.
These are tool-style recommendations, not results from hands-on testing or verified current customer ratings. Check each manufacturer’s compatibility guidance before buying, especially if you own a hard Japanese knife.
Frequently Asked Questions
Should you hone a chef knife before every use?
Not necessarily. Hone before cooking if the knife has lost some cutting bite, or maintain it every few uses when needed. A knife that already cuts cleanly doesn’t need extra strokes simply because you’re starting a meal.
Can you hone a chef knife without a honing steel?
Yes, but you need a suitable alternative maintenance tool. A compatible ceramic rod or sharpening system may work, depending on the knife and the tool’s design. A whetstone can sharpen a worn edge, but it requires a different technique and removes metal.
Does honing make a dull knife sharp again?
Honing can improve performance when the edge has become slightly misaligned but remains in good condition. It won’t reliably restore a heavily worn, rounded, or chipped edge. If careful honing doesn’t improve cutting, use a suitable sharpening method or seek professional help.
Is a ceramic honing rod better than a steel rod?
Neither is universally better. A traditional steel rod suits many compatible Western-style knives, while ceramic offers a finer abrasive surface that may suit some harder blades. The correct choice depends on the knife’s hardness, edge geometry, and manufacturer’s recommendations.
Can honing damage a chef knife?
Yes, unsuitable tools, excessive pressure, and inconsistent angles can damage an edge. Ceramic and diamond-coated rods can also remove material, so use them carefully. Keep the rod stable, apply light pressure, and avoid using a conventional honing rod on serrated knives.
Final Takeaway: Hone Carefully, Sharpen When Needed
Learning how to hone a chef knife takes practice, but the routine is straightforward: stabilize the rod, match the recommended angle, glide from heel to tip, and alternate sides with light pressure. Finish by cleaning the blade and checking its cutting performance.
Remember that honing maintains an existing edge rather than rebuilding a worn one. With the right tool, controlled technique, and sensible storage habits, you can keep your chef knife working well between sharpening sessions.
Ready to maintain your knife? Start with a few slow, controlled strokes and test the result before doing more. If the edge still struggles, follow a suitable chef knife sharpening guide instead of continuing to hone.
Affiliate disclosure: This article contains affiliate links. If you purchase through these links, CookingFlavour may earn a commission at no additional cost to you.