How to Laser Engrave a Cutting Board: A Step-by-Step Guide
Quick Answer
To laser engrave a cutting board, choose untreated hardwood, prepare your design, secure the board, focus the laser, and run a test engraving before starting the final project. Clean away residue and apply food-grade mineral oil afterward. For safe kitchen use, engrave the back rather than the food-cutting surface, following xTool’s cutting board engraving guidance.
Quick Engraving Steps
- Choose your board: Select untreated maple, cherry, walnut, or another suitable hardwood.
- Prepare the wood: Sand if necessary, remove dust, and let the board dry.
- Create your design: Import a name, logo, illustration, or message into compatible software.
- Position and focus: Secure the board and set the correct laser focus.
- Test the settings: Experiment with power and speed on matching scrap wood.
- Engrave and finish: Run the design, remove residue, and condition the clean wood.
Important: Never leave an operating laser unattended. Use suitable ventilation and keep the engraved surface away from food preparation.
A personalized cutting board can make a memorable wedding gift, housewarming present, or attractive kitchen decoration. Laser engraving lets you add detailed lettering and artwork without carving every line by hand.
I’ll explain the full process, from choosing wood to adjusting settings and finishing the completed design. I’ll also cover common mistakes that can ruin an otherwise beautiful board.
What Is Laser Engraving on a Cutting Board?
Laser engraving is a process that uses a focused laser beam to remove or darken a material’s surface. On wood, controlled heat creates a permanent design by changing and removing small amounts of the wood.
Definition: A laser-engraved cutting board is a wooden board personalized with lettering, patterns, or images created by a laser engraving machine.
Unlike printed decorations, an engraved design becomes part of the wooden surface. Its appearance depends on the wood grain, laser power, engraving speed, and design detail.
The engraving also creates textured, sometimes charred grooves. That’s why I recommend keeping the decorated face separate from the surface used for chopping food.
What Can You Engrave on a Cutting Board?
- Names and initials: Personalized monograms and family names.
- Wedding details: Names, dates, and commemorative messages.
- Kitchen artwork: Herbs, vegetables, utensils, and decorative borders.
- Business branding: Restaurant logos and promotional designs.
- Family recipes: Handwritten recipe scans converted into engravable artwork.
- Housewarming messages: Short quotations and meaningful dates.
Simple designs usually provide the most predictable results. Fine photographic details require more careful image preparation and testing.
Which Cutting Board Wood Is Best for Laser Engraving?
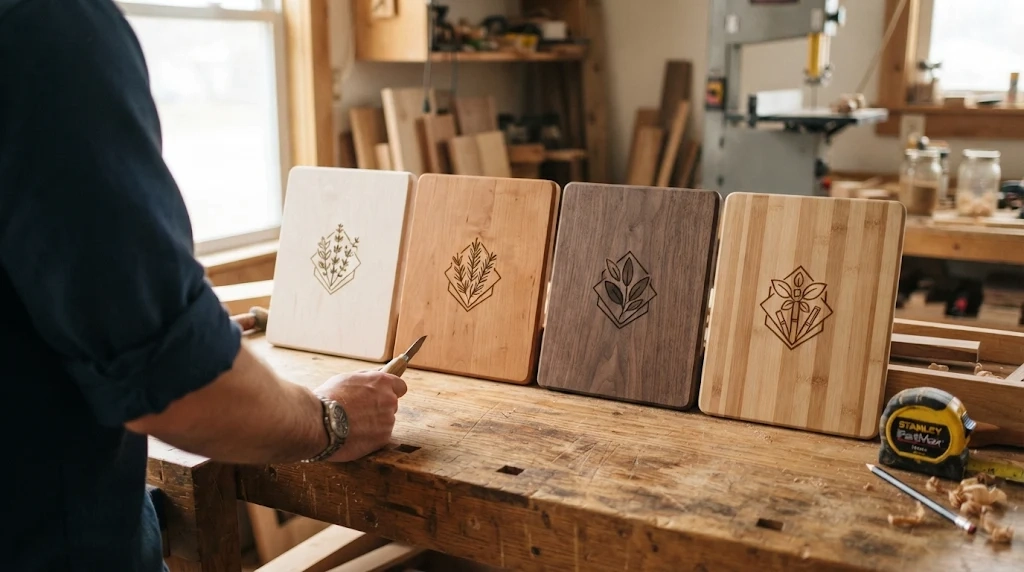
Maple, cherry, walnut, and carefully selected bamboo boards can all accept laser engraving. For a beginner, I would start with a smooth, unfinished maple or cherry board.
The best wood has a consistent surface without excessive knots, cracks, or unknown coatings. Its color and grain should also complement the artwork.
Cutting Board Wood Comparison
| Wood Type | Appearance | Engraving Consideration | Best Use |
|---|---|---|---|
| Hard Maple | Light cream | Good potential for dark contrast | Lettering and logos |
| Cherry | Warm reddish brown | Fine grain supports detailed designs | Personalized gifts |
| Walnut | Dark brown | Dark engraving may have lower contrast | Decorative boards |
| Bamboo | Light tan with visible strips | Glue lines and grain may produce uneven marks | Simple designs |
For a complete homemade project, see my guide on how to make a wooden cutting board. It covers choosing hardwood, assembling the board, and preparing the finished surface.
Should You Use an End-Grain or Edge-Grain Board?
Both constructions can be engraved, but their surfaces behave differently. Edge-grain boards generally provide a more continuous wood pattern for lettering.
End-grain boards show the ends of the wood fibers and often contain many individual blocks. Those differences can make engraving contrast less consistent.
- Edge grain: My preferred starting choice for simple logos and names.
- End grain: Suitable for decorative designs after testing individual wood sections.
- Single-piece hardwood: Can provide an uninterrupted engraving area if the blank is stable and flat.
What Materials Should You Avoid?
Never assume that every wooden-looking board is suitable for laser engraving. Unknown coatings and adhesives can release hazardous fumes when heated.
- Pressure-treated or chemically preserved wood.
- Painted boards with unidentified coatings.
- Vinyl-covered surfaces and PVC-containing materials.
- Reclaimed wood with unknown treatment history.
- Composite materials without manufacturer approval for laser processing.
- Boards containing damaged glue joints, extensive cracks, or contamination.
Confirm that the exact material is laser-compatible before processing it. If the coating or adhesive composition is unknown, choose another blank.
What Tools Do You Need to Laser Engrave a Cutting Board?
You need a compatible laser engraver, a prepared wooden board, design software, and basic finishing supplies. Proper ventilation and suitable machine safety equipment are essential.
Essential Equipment Checklist
- Laser engraver: A diode or CO2 machine suitable for wood.
- Wooden cutting board: A flat, untreated, laser-compatible blank.
- Design software: LightBurn, xTool Creative Space, or software compatible with your machine.
- Computer: For preparing and sending the engraving file.
- Measuring tools: Ruler, tape measure, and non-permanent positioning aids.
- Material support: A suitable workbed and nonflammable positioning fixtures.
- Ventilation: Manufacturer-approved exhaust equipment for removing fumes.
- Cleaning supplies: Soft brush, clean cloths, and suitable cleaning materials.
- Food-grade mineral oil: For conditioning the finished wooden board.
A properly enclosed laser system simplifies beam containment, but it does not eliminate fire or smoke hazards. Follow your machine’s operating instructions and wear appropriate protective equipment.
MIT’s laser cutter safety guidance explains why ventilation, material selection, fire prevention, and constant supervision matter.
How to Laser Engrave a Cutting Board Step by Step
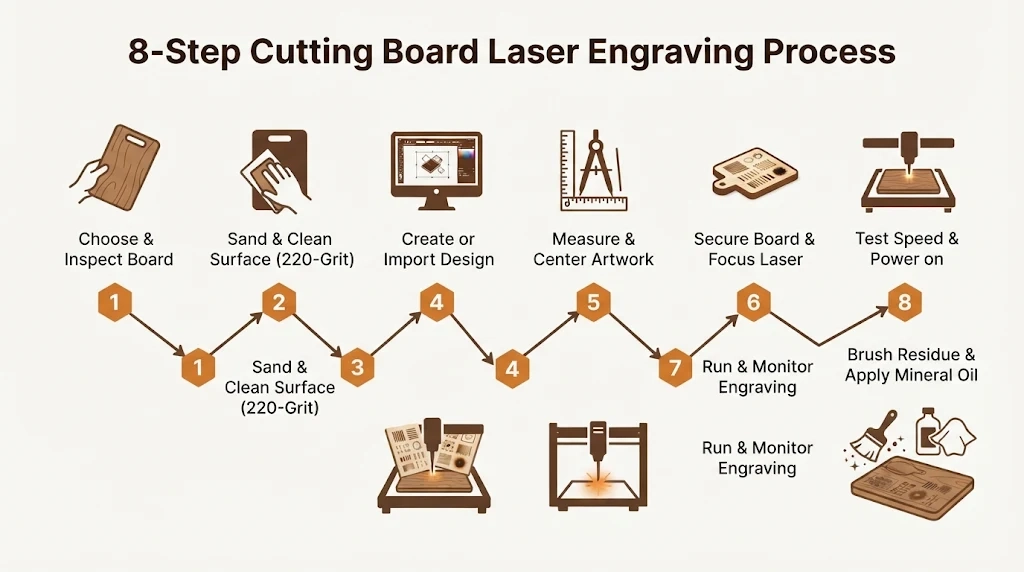
The following workflow applies to many diode and CO2 woodworking laser systems. Your machine’s manufacturer instructions take priority wherever the procedures differ.
Step 1: Choose and Inspect Your Cutting Board
Start with an unfinished hardwood board that fits your laser’s working area. Check both faces for damage and decide which side will carry the engraving.
For example, a 12 × 18-inch board offers plenty of room for a family name or decorative monogram. However, measure the machine’s usable engraving area before purchasing your blank.
- Confirm the wood species and treatment history.
- Inspect for cracks, loose joints, and uneven surfaces.
- Check that the board fits the laser bed.
- Choose the back for decorative engraving.
- Keep the opposite side smooth for everyday food preparation.
Step 2: Prepare the Wooden Surface
A clean, dry, reasonably smooth surface helps the laser produce consistent marks. Remove dust and correct minor surface imperfections before positioning the board.
If the blank needs sanding, use progressively finer abrasives according to its condition. A final pass with approximately 220-grit sandpaper often creates a suitable starting surface.
- Inspect the surface under good lighting.
- Sand rough areas without creating dips.
- Remove sanding dust with a suitable brush or vacuum.
- Clean away remaining debris.
- Let the wood dry completely before engraving.
Do not apply an unfamiliar finish before laser processing. Unknown coatings may discolor, burn unpredictably, or release hazardous fumes.
If you’re restoring an older board, follow my cutting board refinishing guide for additional surface preparation advice.
Step 3: Create or Import Your Engraving Design
Open your laser’s supported design software and create the artwork. You can use text, imported vector graphics, or a suitable black-and-white image.
SVG files often work well for logos and scalable lettering. High-resolution PNG files can also work when the software supports raster engraving.
- Names: Choose readable lettering without excessively thin strokes.
- Logos: Use clean outlines and avoid unnecessary small details.
- Monograms: Leave enough space between decorative elements.
- Recipes: Clean up scanned handwriting before engraving.
- Illustrations: Simplify complex shading when possible.
My preferred design approach is to begin with a simple, centered composition. It makes alignment easier and reduces the risk of overwhelming the natural wood grain.
Step 4: Measure and Position the Artwork
Measure the cutting board carefully and identify its center. Use your software’s positioning tools to place the design in the intended location.
For a practical example, consider an 18-inch-long board with a 4-inch-wide monogram. Centering that design horizontally leaves approximately 7 inches on either side.
- Enter the board dimensions in your design workspace.
- Set the artwork to its intended finished size.
- Check its distance from handles, corners, and grooves.
- Position the design relative to the board’s actual location.
- Preview the engraving area before starting.
Leave reasonable clearance around the artwork. A design placed too close to a rounded edge may become distorted or incomplete.
Step 5: Secure the Board and Focus the Laser
Place the board flat on the machine’s approved work surface. Use suitable restraints if movement is possible, keeping them clear of the laser path.
Set the focus according to your laser manufacturer’s procedure. Incorrect focus can produce wider lines, reduced contrast, and blurry lettering.
- Check that the wood lies flat.
- Make sure the laser head can move freely.
- Confirm the correct material thickness or focus distance.
- Check that ventilation is operating.
- Keep the work area free of loose combustible debris.
Use the machine’s framing or boundary-preview feature if available. Confirm that the proposed path stays inside the intended design area.
Step 6: Test Your Laser Power and Speed
Never start a final engraving with untested settings. Laser behavior varies with machine type, optical power, wood species, and surface condition.
I recommend testing several small squares on matching scrap wood. Use one pass initially and compare darkness, sharpness, and unwanted charring.
For illustration, a 10W optical-output diode laser might use the following small calibration grid. These values are experimental test points, not validated settings or universal recommendations.
| Test Group | Speed | Power Levels | Purpose |
|---|---|---|---|
| A | 1,500 mm/min | 20%, 35%, 50% | Observe slower passes |
| B | 2,500 mm/min | 20%, 35%, 50% | Compare medium-speed marks |
| C | 3,500 mm/min | 20%, 35%, 50% | Check lighter, faster marks |
Important: Use this grid only if these speeds and power levels fall within your manufacturer’s recommended range. Never apply diode laser settings to a CO2 machine without recalibration.
For wood engraving, the goal is a readable mark with minimal unwanted scorching. More power does not automatically create a better result.
Step 7: Run the Final Engraving
After selecting suitable tested settings, load your final design. Check the placement and confirm that the board remains secure.
- Confirm the correct artwork file.
- Verify the engraving dimensions.
- Check focus and material placement again.
- Activate the required ventilation and safety systems.
- Start the engraving operation.
- Monitor the entire process for smoke buildup or flare-ups.
- Stop the machine immediately if unsafe conditions develop.
Do not open an enclosure or handle the board until the machine reaches a safe state. Follow the manufacturer’s shutdown instructions before removing the project.
Step 8: Clean the Engraving and Apply a Finish
Once the board has cooled, inspect the design for loose soot and charred residue. Remove surface debris carefully without grinding away the lettering.
A soft brush and suitable cleaning cloth can help remove residue. If the manufacturer permits damp cleaning, dry the wood completely before applying conditioner.
- Remove loose engraving residue.
- Inspect the artwork and surrounding surface.
- Clean the board using a method appropriate for its material.
- Allow the wood to dry thoroughly.
- Apply a thin layer of food-grade mineral oil.
- Let the oil absorb according to the product instructions.
- Buff away excess oil before using the board.
Food-grade mineral oil conditions the wood without creating a brittle coating. You can find detailed maintenance instructions in my guide on how to oil a wooden cutting board.
How Do You Get Dark, Clean Laser Engraving on Wood?
Clean engraving depends on balanced power, accurate focus, stable material, and effective smoke removal. Excessive heat can create heavy soot instead of crisp contrast.
Try improving the existing settings before increasing laser power. Small adjustments often provide more predictable results than changing several controls simultaneously.
Tips for Better Engraving Quality
- Use suitable hardwood: Fine-grained surfaces often produce more consistent lettering.
- Check the focus: Incorrect focus can soften the artwork’s edges.
- Run material tests: Compare multiple settings before engraving the actual board.
- Reduce excessive burning: Try faster movement or lower power when appropriate.
- Manage smoke: Follow the machine’s recommended ventilation and air-assist settings.
- Use compatible masking: Approved paper masking may help reduce surface staining.
- Clean the optics: Follow manufacturer maintenance procedures.
Never substitute vinyl transfer tape for laser-approved paper masking. PVC-containing products can release dangerous fumes during laser processing.
Why Does Laser Engraving Sometimes Look Uneven?
Uneven engraving can result from variations in wood density, focus, speed, or surface coating. Bamboo and multi-species boards may show especially noticeable changes across different sections.
Common Problems and Solutions
| Problem | Possible Cause | Suggested Correction |
|---|---|---|
| Faint lettering | Insufficient engraving energy | Retest speed and power within approved limits |
| Heavy black residue | Excessive charring or smoke deposits | Reduce heat input and check smoke extraction |
| Blurry edges | Poor focus or movement | Refocus and secure the board |
| Uneven darkness | Grain or material variation | Test a more uniform wood section |
| Incomplete design | Incorrect alignment or working area | Recheck dimensions and framing |
If a design looks too dark, avoid immediately sanding the entire area. Sanding can change its appearance and remove more material than intended.
Are Laser-Engraved Cutting Boards Food Safe?
A laser-engraved board can serve as a functional kitchen board when the food-cutting face remains smooth, suitable, and easy to clean. However, I would not use the engraved surface for chopping food.
Laser engraving leaves grooves and charred areas that can collect food residue. Applying food-grade oil does not automatically make those grooves hygienic for direct knife contact.
How to Keep the Board Suitable for Kitchen Use
- Engrave the back of a functional cutting board.
- Keep the food-preparation surface unengraved.
- Use wood and finishes intended for the board’s use.
- Remove engraving debris before bringing the board into the kitchen.
- Clean and dry the board after food preparation.
- Replace boards with excessive cracks or hard-to-clean grooves.
The USDA’s cutting board safety guidance recommends proper washing and replacing excessively worn boards. These practices remain important after personalization.
If the decoration covers the main presentation face, consider treating that face as decorative only. You can turn the board over for food preparation, provided the reverse side remains suitable.
What Is the Best Finish for a Laser-Engraved Cutting Board?
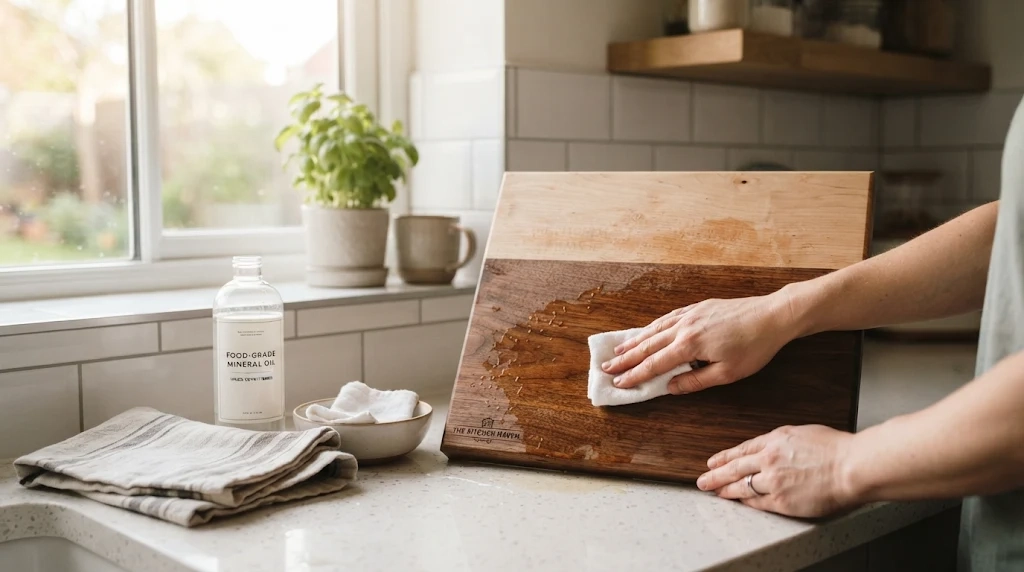
Food-grade mineral oil is a practical finishing choice for many wooden cutting boards. It conditions exposed wood while preserving its natural appearance.
Michigan State University’s mineral oil guidance describes food-grade mineral oil as a suitable wood conditioner for cutting boards.
Finishing Options Compared
- Food-grade mineral oil: An easy-to-apply option for routine wood conditioning.
- Cutting board conditioner: Products containing mineral oil and suitable waxes may provide additional moisture resistance.
- Vegetable cooking oil: Generally undesirable because many plant oils can become rancid.
- Ordinary furniture varnish: Avoid unless the manufacturer confirms suitability for the intended food-contact and knife-use conditions.
Even a food-contact-appropriate finish does not make engraved grooves ideal for chopping. Keep decorative engraving away from the cutting face.
How Should You Clean and Maintain an Engraved Cutting Board?
Regular cleaning protects the usable surface and helps preserve the board’s condition. Wash the food-preparation face with appropriate dish soap and water after use.
Avoid soaking wooden boards or leaving them wet on the countertop. Prolonged moisture can contribute to warping, cracking, and damaged glue joints.
Simple Maintenance Routine
- Remove food residue after each use.
- Wash the food-contact surface with warm water and dish soap.
- Rinse thoroughly.
- Dry immediately with a clean towel.
- Allow air to circulate around both sides.
- Apply food-grade mineral oil when the wood becomes dry.
- Inspect regularly for cracks and difficult-to-clean damage.
Keep the engraved decoration clean and dry as well. If moisture problems develop, see my guide on how to prevent mold on cutting boards.
Creative Laser-Engraved Cutting Board Ideas
Personalized engraving works especially well when the design suits the board’s shape and the recipient’s style. You don’t need complicated artwork to make a strong impression.
Popular Design Ideas
- Wedding gift: Couple’s names and wedding date.
- Housewarming present: Family surname with a simple decorative border.
- Holiday gift: A seasonal message and small illustration.
- Family keepsake: A reproduced handwritten recipe.
- Restaurant decoration: A clean logo on a display board.
- Birthday gift: Name, meaningful date, and short personal message.
- Kitchen decoration: Botanical line art or an engraved utensil pattern.
For a first project, I would choose a short family name with a small ornamental element. This keeps the engraving manageable and allows the wood grain to remain visible.
Recommended Tools for Laser Engraving Cutting Boards
If you’re building your engraving setup, these products cover different needs. The scores below are editorial suitability assessments based on product features, not customer-review averages or claims of personal testing.
🏆 Best for Home Engraving
xTool S1 20W Diode Laser Engraver
★★★★☆ 4/5 Editorial Fit
The xTool S1 20W is an enclosed diode laser system designed for compatible materials, including wood. Its approximately 498 × 319 mm working area makes it worth considering for many personalized board projects.
I would shortlist it for home projects where enclosure design and straightforward positioning are priorities. Confirm board thickness, accessories, and ventilation requirements before ordering.
⚙️ Best for Advanced Projects
OMTech Polar S 55W CO2 Laser Engraver
★★★★☆ 4/5 Editorial Fit
The OMTech Polar S uses a 55W CO2 laser system suitable for engraving compatible wood. It offers a different class of equipment for makers handling more involved engraving projects.
I would consider it when greater production capability matters more than a basic hobby setup. Check installation space, cooling, exhaust, and maintenance requirements carefully.
🌿 Best for Wood Conditioning
Howard Cutting Board Oil
★★★★☆ 4/5 Editorial Fit
Howard Cutting Board Oil contains pure food-grade mineral oil for conditioning wooden cutting boards and butcher blocks. It offers a straightforward finishing option after engraving residue has been removed.
I prefer this type of simple maintenance product over unidentified furniture finishes for functional kitchen boards. Apply it according to the label and wipe away excess oil.
Affiliate disclosure: As an Amazon Associate, we earn from qualifying purchases. Product availability and prices may change.
Frequently Asked Questions
Can You Laser Engrave Any Wooden Cutting Board?
No. Choose wood with a known material composition and confirm that it is suitable for laser processing. Avoid pressure-treated wood, unidentified coatings, and boards containing questionable adhesives.
Maple, cherry, and walnut are useful options for many projects. Always test the actual material before engraving the finished board.
Can You Use a 10W Diode Laser to Engrave a Cutting Board?
Yes, a compatible 10W optical-output diode laser can engrave many suitable wooden boards. However, results depend on wood density, machine design, focus, and engraving settings.
Test on matching scrap wood and use manufacturer-approved settings. A 10W machine may require a different combination of power and speed than a higher-powered laser.
How Deep Should You Laser Engrave a Cutting Board?
A shallow, legible engraving is generally sufficient for personalized lettering and decorative artwork. Deep engraving is rarely necessary for a simple name or logo.
Greater depth produces more textured areas that can collect residue. Keep engraved designs on a non-cutting face, regardless of their depth.
Should You Oil a Cutting Board Before or After Laser Engraving?
For an untreated wooden blank, I recommend engraving before applying mineral oil. This avoids introducing an additional surface treatment during laser processing.
After engraving, remove loose char and debris, clean the board appropriately, and allow it to dry. Then apply food-grade mineral oil according to the manufacturer’s instructions.
Can You Cut Food on a Laser-Engraved Cutting Board?
You can use the smooth, unengraved face of an otherwise suitable wooden cutting board for food preparation. Avoid chopping directly on the engraved design because grooves and charred areas are harder to keep clean.
Clean and dry the board after use. Replace it if damage creates cracks or grooves that cannot be properly cleaned.
Final Takeaway: How to Laser Engrave a Cutting Board Successfully
Laser engraving can turn an ordinary wooden board into a personalized gift or attractive kitchen accessory. The best results come from choosing suitable wood, preparing a clean design, and testing your laser before the final pass.
For a functional cutting board, keep the engraved artwork on the back and preserve a smooth chopping surface. Cleaning, proper drying, and occasional conditioning also help maintain the wood.
Start with a simple monogram or family name on an untreated hardwood blank. Once your settings produce clean, readable lettering, you can explore more detailed patterns and personalized designs.