How to Repair a Cracked Cutting Board: A Step-by-Step Guide
Quick Answer
To repair a cracked wooden cutting board, clean and dry it, assess the damage, and apply an adhesive specifically approved for the intended food-contact use. Clamp the joint, allow the glue to cure fully, then sand and finish the surface with food-grade mineral oil. Only return the board to food preparation if the repair is sound, smooth, and easy to clean. Replace boards with deep, contaminated, or unrepairable cracks, following USDA food safety guidance.
Quick Repair Steps
- Inspect the damage: Check whether the crack is shallow, structural, or contaminated.
- Clean and dry: Remove residue and let the wood dry completely.
- Apply suitable adhesive: Use only a product appropriate for the board’s intended use.
- Clamp carefully: Bring the wood edges together without excessive pressure.
- Cure and sand: Follow the adhesive instructions and smooth the repaired area.
- Finish and inspect: Apply food-grade mineral oil and verify the board can be cleaned safely.
Important Safety Reminder
- A glued repair is not automatically safe for direct food contact.
- If a crack can trap food or moisture, replace the board rather than risk contamination.
A crack in your favorite cutting board can be frustrating, especially when the wood still looks beautiful. Fortunately, some small cracks can be repaired, although not every repaired board should return to food preparation.
In this guide, I’ll explain how to assess the damage, choose repair materials, and restore a wooden board. I’ll also show you when replacing the board is the safer choice.
Can You Repair a Cracked Cutting Board?
Yes, some cracked wooden cutting boards can be repaired. Whether they can safely return to kitchen use depends on the crack, the wood, the adhesive, and the final surface.
A wooden cutting board crack is a separation in the wood fibers or between glued wooden sections. It may develop from moisture changes, mechanical stress, or a failed glue joint.
Which Cracks Are Repairable?
- Minor surface checks: Small, clean splits may be repairable or removable through careful resurfacing.
- Clean glue-joint separations: Some separated joints can be professionally rejoined.
- Deep cracks: Cracks extending into the board can trap moisture and food particles.
- Loose or unstable sections: Structural failures make safe food preparation difficult.
- Rotten or moldy wood: Replace the board rather than attempting a cosmetic repair.
A crack that closes under pressure may look easy to fix. However, it still needs a thorough assessment before you decide whether it belongs in the kitchen again.
When Should You Replace the Board Instead?
 Save
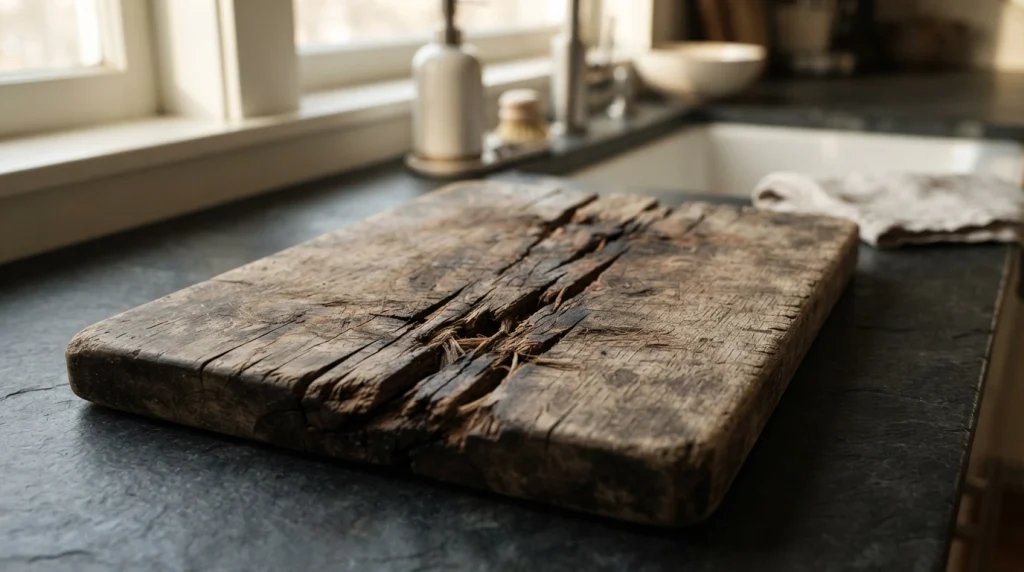
Replace a cutting board when damage prevents effective cleaning or sanitizing. The USDA recommends discarding excessively worn cutting boards with hard-to-clean grooves.
The University of Maine Cooperative Extension also identifies deep cracks and excessive wear as reasons to replace a board.
- The crack contains stubborn dirt, food debris, or mold.
- The board separates into unstable sections.
- The surface has numerous deep knife grooves.
- The wood has begun to rot or crumble.
- The crack remains open after repair.
- The adhesive is not suitable for the intended food-contact application.
For an expensive or sentimental cutting board, a woodworking professional may be able to restore its appearance. You can also preserve the board for decorative purposes without using it to prepare food.
Why Do Wooden Cutting Boards Crack?
Wood naturally absorbs and releases moisture. Repeated moisture changes cause expansion and contraction, which can eventually create splits.
Understanding the cause helps you avoid repeating the same damage after a repair.
Common Causes of Cutting Board Cracks
- Excessive water exposure: Soaking a board allows moisture to penetrate the wood.
- Uneven drying: One side may dry faster than the other, creating internal stress.
- Dishwasher exposure: Heat and prolonged water contact can damage many laminated wooden boards.
- Low humidity: Dry indoor conditions may cause wood to shrink.
- Neglected maintenance: A poorly maintained surface may absorb moisture unevenly.
- Weak glue joints: Aging or poorly bonded joints can separate over time.
- Physical impact: Dropping a heavy board may produce sudden fractures.
One useful habit is to inspect both sides before washing a wooden board. Small changes in the seams or edges may reveal damage before a major split develops.
What Tools and Materials Do You Need?
 Save
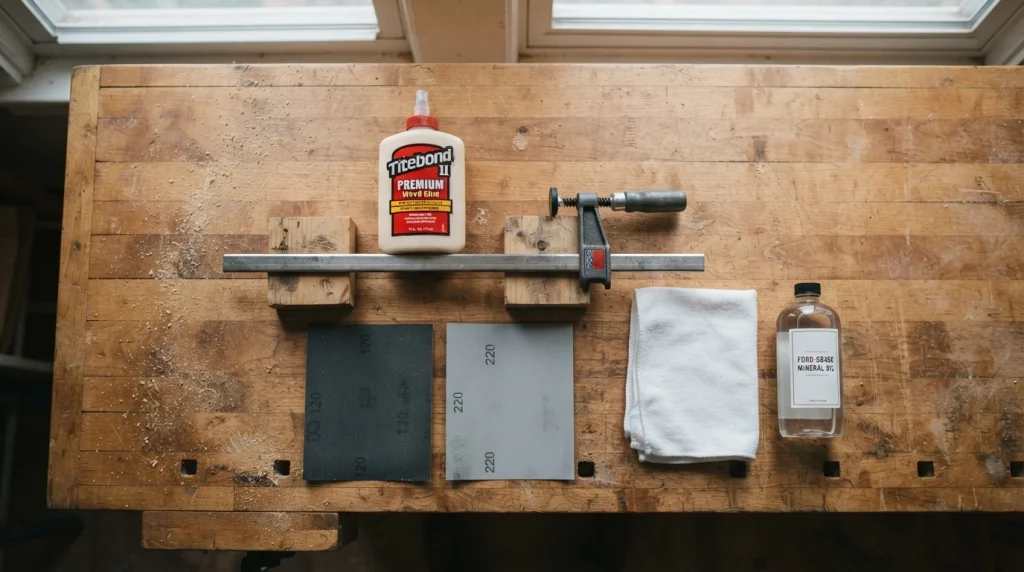
You don’t need an elaborate woodworking workshop for a basic repair. However, choosing an appropriate adhesive is more important than purchasing additional tools.
| Tool or Material | Purpose | Important Consideration |
|---|---|---|
| Suitable wood adhesive | Rejoins separated wood | Verify intended food-contact suitability |
| Bar clamps | Hold the joint closed | Avoid excessive pressure |
| 120- and 220-grit sandpaper | Smooths repaired surfaces | Sand along the grain |
| Clean cloth | Removes residue and dust | Use a lint-free cloth |
| Food-grade mineral oil | Conditions the wood | Does not repair structural cracks |
| Clamp pads or wood scraps | Protects board edges | Prevents clamp marks |
For a simple edge separation, clamps and adhesive may be enough. A wider split often needs more advanced woodworking techniques.
How to Repair a Cracked Wooden Cutting Board Step by Step
Start only after confirming the wood is sound and the crack can be cleaned thoroughly. The following steps describe a general woodworking repair, not a guarantee of food-contact safety.
Step 1: Examine the Crack Carefully
Place the cutting board on a clean, level surface. Examine the top, bottom, and edges under good lighting.
- Locate the beginning and end of the crack.
- Determine whether the split follows a glue joint or runs through solid wood.
- Look for dark staining, moisture, loose fibers, or trapped debris.
- Check whether the board rocks or bends.
- Decide whether repair is reasonable or replacement is safer.
Don’t force a crack wider to inspect it. Additional pressure could damage the surrounding wood.
Step 2: Clean and Dry the Board
Clean the cutting board with warm water and mild dish soap. Rinse it thoroughly and remove any visible food residue.
Dry it with a clean towel and position it upright in a ventilated area. Allow it to dry completely before applying adhesive.
- Never soak the board to loosen debris inside a crack.
- Avoid using a dishwasher for laminated wooden boards.
- Don’t apply glue over damp or contaminated wood.
- Replace the board if the crack cannot be cleaned adequately.
Drying may take a day or longer, depending on the thickness and moisture exposure. A dry exterior doesn’t always mean the inside is dry.
Step 3: Choose the Correct Adhesive
Select an adhesive designed for the wood joint and its intended environment. Water resistance alone does not establish suitability for direct food contact.
Some woodworking adhesives are marketed for incidental food contact after curing. Always check the manufacturer’s current technical documentation and permitted uses.
- Check whether the adhesive is suitable for wooden kitchenware.
- Read its curing and clamping instructions.
- Confirm the intended food-contact conditions.
- Do not assume all waterproof glues are food-safe.
- Avoid unverified fillers or household repair chemicals.
If you cannot confirm the adhesive’s suitability, reserve the repaired board for decoration or replace it.
Step 4: Apply Adhesive to the Clean Joint
Follow the manufacturer’s application instructions. A small brush or approved applicator may help spread adhesive along accessible surfaces.
- Protect your workspace with a clean sheet or disposable covering.
- Open the accessible joint only as much as needed without forcing it.
- Apply the adhesive according to its instructions.
- Bring the matching wood surfaces together.
- Remove excess adhesive as directed by the manufacturer.
A narrow crack may not allow proper adhesive penetration. If the joint cannot be prepared correctly, a superficial glue application is unlikely to create a reliable repair.
Step 5: Clamp the Board Securely
Position clamps so they distribute pressure across the damaged joint. Use wood pads between the clamps and board edges to reduce marking.
Tighten gradually until the joint closes evenly. Excessive pressure can distort the board or squeeze out too much adhesive.
- Keep the board on a stable, flat surface.
- Check alignment before the glue begins to set.
- Follow the adhesive’s recommended clamping duration.
- Avoid disturbing the joint during curing.
Clamping time and full curing time are not necessarily the same. A joint may feel firm long before the adhesive reaches its intended performance.
Step 6: Allow the Adhesive to Cure Completely
Leave the repaired board undisturbed for the full manufacturer-specified curing period. Temperature, humidity, and joint conditions can affect curing.
Never return the board to food preparation simply because the surface feels dry. Confirm that all use and curing requirements have been met.
Step 7: Sand the Repaired Surface
Once the adhesive has cured, inspect the joint before sanding. Do not attempt to hide an unstable or open crack beneath a smooth surface.
- Remove any remaining surface residue using an approved method.
- Start with approximately 120-grit sandpaper if leveling is needed.
- Sand gently along the wood grain.
- Move to 220-grit sandpaper for a smoother finish.
- Remove all sanding dust with a clean cloth.
Use minimal sanding on thin boards because removing too much wood can change their shape. Wear suitable dust protection when sanding.
Step 8: Apply Food-Grade Mineral Oil
Food-grade mineral oil can help condition a dry wooden cutting board. It doesn’t glue cracks together or make an unsuitable repair safe.
- Make sure the board is clean and completely dry.
- Apply a modest amount of food-grade mineral oil.
- Spread it across the surface using a lint-free cloth.
- Allow sufficient time for absorption.
- Wipe off any remaining excess oil.
For more maintenance guidance, consult the University of Maine’s cutting board care recommendations before applying a finish.
Step 9: Inspect the Finished Repair
Check whether the board lies flat and whether the repaired joint stays closed during gentle handling. The surface should not contain gaps that trap food or moisture.
If any uncertainty remains about the adhesive or cleanability, don’t use the board for food preparation. A smooth appearance alone is not proof of safety.
Which Cutting Board Repair Method Is Best?
Different types of damage require different decisions. Some surface defects can be corrected, while structural damage may require professional attention or replacement.
| Damage Type | Possible Approach | Recommendation |
|---|---|---|
| Minor surface roughness | Light sanding | May be suitable if no crack remains |
| Clean separated glue joint | Proper joint preparation and regluing | Assess adhesive and food-contact safety |
| Deep structural split | Professional woodworking repair | Replace for routine food preparation |
| Cracked plastic board | Replacement | Do not rely on glue or filler |
| Moldy or contaminated crack | Replacement | Do not reuse for food preparation |
For a cutting board used every day, replacement is often the simplest decision when the damage is extensive. A decorative repair can preserve a meaningful object without introducing unnecessary food safety risks.
Can You Repair a Cracked Bamboo Cutting Board?
Some bamboo board joints can be repaired using suitable woodworking techniques. However, bamboo cutting boards commonly consist of glued strips, and a separating joint may indicate broader damage.
Inspect the full length of each affected seam. If multiple joints are opening, replacing the board is usually more sensible than repairing them individually.
- Check for separated laminated strips.
- Look for moisture damage along the edges.
- Never assume a glued seam is safe for direct food contact.
- Discard boards with inaccessible or contaminated cracks.
Can You Fix a Cracked Plastic Cutting Board?
Replacing a cracked plastic cutting board is the safer choice. Cracks can create difficult-to-clean areas, and household glues may not restore the original hygienic surface.
According to FDA cleaning and food safety guidance, excessively worn cutting boards should be replaced because bacteria can remain in damaged surfaces.
A new, smooth plastic board can also be easier to maintain. Choose one with clear cleaning instructions and replace it once severe grooves develop.
What Mistakes Should You Avoid When Repairing a Cutting Board?
Most repair problems come from poor preparation, unsuitable products, or returning a damaged board to service too soon. Avoid these common mistakes.
- Gluing wet wood: Moisture may interfere with proper adhesion.
- Using random fillers: Not every wood filler or epoxy is appropriate for cutting surfaces.
- Ignoring contamination: Adhesive should never be used to conceal trapped food or mold.
- Rushing curing: Follow the full adhesive curing instructions.
- Overtightening clamps: Too much force may damage or distort the joint.
- Over-sanding: Uneven sanding can leave an unstable cutting surface.
- Using cooking oil as a finish: Some vegetable oils can become sticky or rancid.
- Assuming waterproof means food-safe: These are different product properties.
The most important mistake is treating every crack as a cosmetic problem. A cutting board also needs to remain cleanable and suitable for food preparation.
How Can You Prevent Your Cutting Board From Cracking Again?
 Save
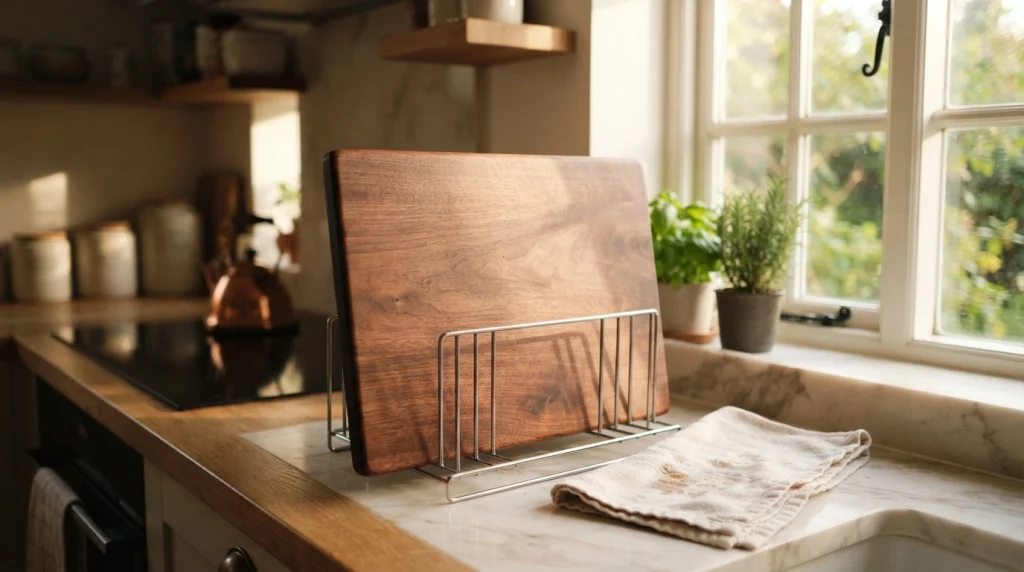
Proper cleaning, drying, storage, and conditioning can reduce moisture-related stress. These practices are useful for both new and restored wooden cutting boards.
Wash It Properly
Wash the board promptly after use with warm water and dish soap. Avoid leaving wooden boards submerged in the sink.
Use a separate board for raw meat when possible. The University of Illinois Extension recommends dedicated cutting boards to reduce cross-contamination.
Dry Both Sides Thoroughly
Dry the board with a clean towel immediately after washing. Then allow air to circulate around both faces.
Standing a board upright on a suitable rack can help prevent moisture from collecting underneath.
Condition the Wood When Needed
Apply food-grade mineral oil according to the product directions and the condition of the wood. There is no universal schedule suitable for every board or climate.
Conditioning helps maintain the wood surface, but it cannot prevent every crack. Correct storage and moisture management remain important.
Keep the Board Away From Extreme Heat
Avoid placing wooden cutting boards beside hot burners, radiators, or direct heating sources. Rapid drying may increase stress within the wood.
Do not leave boards in prolonged direct sunlight. Choose a dry location with relatively stable conditions.
Useful Products for Cutting Board Repair and Maintenance
If you’re restoring a wooden cutting board, these are three established products worth researching. Check their current instructions and specifications before purchasing.
Affiliate disclosure: As an Amazon Associate, this website may earn from qualifying purchases.
Best for Wood Joints
Titebond III Ultimate Wood Glue
★★★★☆
A waterproof woodworking adhesive designed for strong wood joints. I’d consider it when assessing a clean glue-joint repair, but I would verify the manufacturer’s current food-contact guidance before using it on a cutting surface.
Best for Clamping
Bessey GSCC2.524 Bar Clamp
★★★★☆
A woodworking bar clamp that can help hold aligned boards during glue-up. I prefer using protective pads and controlled pressure to avoid damaging the edges.
Best for Maintenance
Howard Cutting Board Oil
★★★★☆
A food-grade mineral oil product intended for wooden cutting boards and butcher blocks. I’d use it for routine conditioning after cleaning and drying, not for sealing structural cracks.
Editor’s note: The star symbols above are editorial suitability indicators, not verified customer review ratings or hands-on test results.
Frequently Asked Questions
Can I use wood glue on a cracked cutting board?
Some woodworking adhesives may be appropriate for certain kitchenware applications, but not every wood glue is suitable for direct food contact. Check the manufacturer’s current documentation, intended uses, and curing requirements. If you cannot verify suitability or clean the repaired seam thoroughly, replace the board.
Can mineral oil fix cracks in a cutting board?
No, mineral oil cannot repair a structural crack or reconnect separated wood fibers. Food-grade mineral oil helps condition wooden surfaces and may reduce moisture-related wear. A board with deep, contaminated, or unstable cracks still needs replacement or appropriate professional assessment.
How long should cutting board glue dry?
Drying and curing times vary by adhesive, temperature, and humidity. Some products allow clamp removal after a relatively short period, but full strength can take longer. Follow the exact manufacturer’s instructions rather than relying on a universal drying time.
Is a cracked cutting board safe to use?
A cracked cutting board may be unsafe if food particles or moisture become trapped inside the damaged area. Even if the surface appears clean, deep cracks can make effective sanitation difficult. Replace boards with persistent, hard-to-clean cracks or extensive wear.
Should I repair or replace my wooden cutting board?
Consider repair only when the wood is sound, the damage is limited, and the finished board can meet the intended food-contact requirements. Replace it when the crack is deep, dirty, unstable, or impossible to clean properly. For sentimental boards, decorative restoration is another option.
Final Thoughts: Is Repairing a Cracked Cutting Board Worth It?
Repairing a cracked cutting board can make sense when the damage is minor and the wood remains structurally sound. Good preparation, appropriate materials, careful clamping, and complete curing all matter.
However, food safety must come first. If a crack cannot be fully cleaned or the repaired surface cannot be verified as suitable for food contact, replacement is the better choice.
Inspect your cutting board regularly, wash and dry it correctly, and condition wooden surfaces when needed. Those simple habits can help your next board last longer.