How to Resurface a Plastic Cutting Board Safely
Quick Answer
To resurface a plastic cutting board safely, first determine whether its manufacturer permits resurfacing. Most household plastic boards are better cleaned thoroughly or replaced when deeply scratched, because DIY sanding can leave tiny grooves that are difficult to sanitize, as explained in university cutting board safety guidance.
Quick steps to assess and refresh your board
- Inspect the surface: Look for deep grooves, raised plastic, cracks, and loose particles.
- Check manufacturer guidance: Confirm whether resurfacing is supported for your board.
- Clean thoroughly: Scrub with dish soap, warm water, and a suitable cleaning brush.
- Sanitize appropriately: Follow a food-contact sanitizer’s directions or approved dishwasher instructions.
- Inspect after drying: Replace boards with damage that prevents effective cleaning.
Important: Never use a heat gun, flame, or unapproved sanding method to repair a food-contact plastic board.
A plastic cutting board can look worn long before it stops being useful. Knife scratches, cloudy patches, and stubborn stains often make an otherwise functional board look ready for the trash.
I prefer checking whether a board can still be cleaned properly before considering any repair. In this guide, I’ll explain safe restoration options, common mistakes, and the signs that mean replacement makes more sense.
What Does Resurfacing a Plastic Cutting Board Mean?
Plastic cutting board resurfacing means removing or correcting a damaged surface layer to restore a smooth, cleanable cutting area. It is different from ordinary washing, stain removal, or sanitizing.
Most household plastic cutting boards use polyethylene or polypropylene. These materials resist moisture and work well for everyday food preparation.
However, repeated knife contact gradually changes the cutting surface. Scratches can collect food residue and make cleaning more difficult.
Why Do Plastic Cutting Boards Develop Scratches?
Every knife stroke creates friction against the board. Repeated cutting eventually leaves marks, even on durable food-grade plastic.
Several conditions can increase surface wear:
- Heavy chopping: Forceful knife strokes can produce deeper cuts.
- Serrated knives: Sawing movements may leave rougher marks.
- Repeated scraping: Dragging a sharp knife edge across plastic increases surface damage.
- Heat exposure: Excessive temperatures may warp or distort certain boards.
- Long-term use: Thousands of ordinary cuts gradually change the surface texture.
Light knife marks do not automatically mean a cutting board is unsafe. The deciding factor is whether you can clean and sanitize it effectively.
Can You Safely Resurface a Plastic Cutting Board?
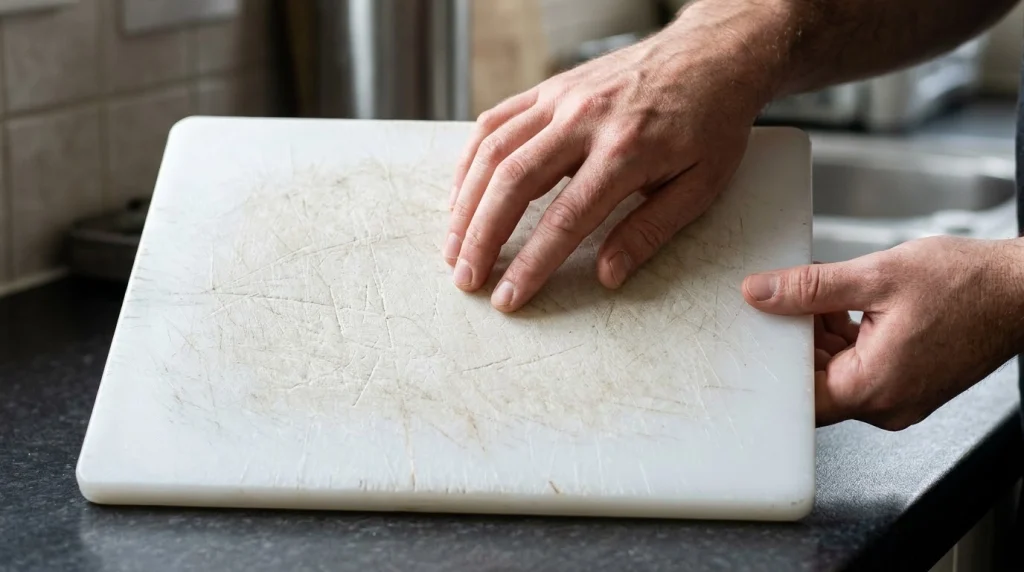
Some commercial cutting boards can be professionally resurfaced when their material and construction allow it. For most household plastic boards, replacement is the safer choice when deep damage develops.
The distinction matters because resurfacing and sanding are not interchangeable. Removing visible scratches does not necessarily produce a hygienic cutting surface.
What Do Food Safety Guidelines Say?
The USDA’s cutting board guidance recommends replacing boards that become excessively worn or develop hard-to-clean grooves.
Commercial food-service rules recognize another possibility. Under Washington State’s cutting surface regulation, damaged boards must be resurfaced when appropriate or discarded when they cannot be resurfaced.
That rule does not mean every household plastic board can be safely repaired with sandpaper. Successful resurfacing must leave the surface suitable for effective cleaning and sanitizing.
Why Is DIY Sanding Often Discouraged?
Sandpaper creates thousands of small abrasive marks while removing material. These marks may remain even when the board looks smoother from a distance.
Plastic manufacturers also warn that sanding can change the original texture. This may leave a slippery cutting surface or introduce unwanted particles.
My practical recommendation is straightforward: Don’t sand a plastic cutting board unless the manufacturer specifically approves the procedure.
When Should You Clean, Resurface, or Replace a Plastic Cutting Board?
Start by identifying the type and severity of the damage. Appearance alone cannot determine whether resurfacing is appropriate.
The following comparison provides a practical starting point.
| Board condition | Recommended action | Reason |
|---|---|---|
| Light surface marks | Continue regular cleaning | Minor scratches may remain manageable. |
| Food stains without deep damage | Wash and sanitize appropriately | Discoloration alone does not prove structural damage. |
| Moderate wear on a commercial board | Seek manufacturer-approved professional evaluation | Some suitable commercial surfaces can be restored. |
| Deep, hard-to-clean grooves | Replace household board | Food residue may remain trapped. |
| Cracks or peeling plastic | Replace immediately | Structural defects are difficult to restore reliably. |
| Warped or unstable board | Replace if it cannot sit securely | Movement increases knife-handling risk. |
A useful inspection question is whether visible grooves still hold residue after washing. If they do, ordinary cleaning may no longer be enough.
How to Refresh a Plastic Cutting Board Step by Step
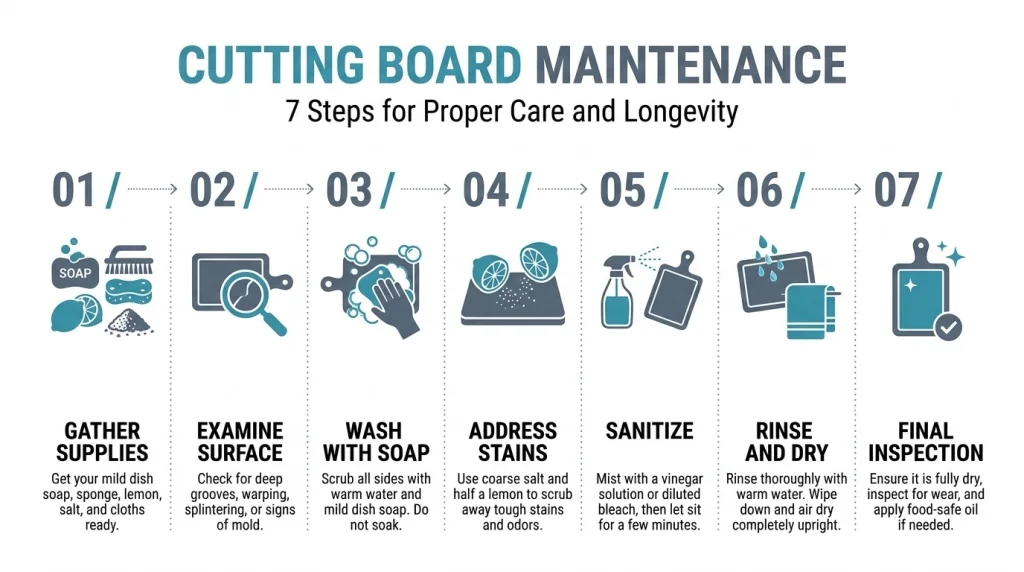
For ordinary household boards, the safest first approach is thorough cleaning and careful inspection. This process refreshes the surface without attempting to remove plastic.
It will not eliminate deep knife grooves. It can, however, help determine whether your board remains suitable for food preparation.
Step 1: Gather the Right Cleaning Supplies
You don’t need power tools for basic plastic cutting board maintenance. A few ordinary cleaning supplies are sufficient.
- Mild dishwashing liquid
- Warm running water
- A clean, nonmetallic scrubbing brush
- A clean sponge or soft cloth
- A food-contact-safe sanitizer, when needed
- A drying rack or clean paper towels
Avoid coarse sandpaper, grinding discs, and aggressive metal brushes. These tools can create additional scratches or remove the original surface finish.
Step 2: Examine the Entire Cutting Surface
Place the board on a clean, flat countertop under bright lighting. Inspect both cutting faces and the edges.
Look for these warning signs:
- Deep knife grooves that catch visible food particles
- Raised or peeling fragments of plastic
- Cracks around corners, handles, or edges
- Rough patches that remain difficult to scrub
- Distortion that makes the board rock or slide
If you find cracks or loose plastic, stop using the board for food preparation. Washing cannot repair these structural problems.
Step 3: Wash With Warm Water and Dish Soap
Rinse loose food residue from the cutting surface. Apply dish soap and scrub both sides using a suitable cleaning brush.
Pay special attention to shallow knife marks and corners. These areas can retain residue after a quick wipe.
Rinse thoroughly with clean water. Check whether stubborn particles remain inside the grooves.
Step 4: Address Surface Stains
Tomatoes, turmeric, berries, and other foods can leave noticeable discoloration. A stained board may still be usable when its surface remains intact and cleanable.
Start with routine dishwashing rather than aggressive abrasion. Follow the manufacturer’s instructions for any additional stain-removal product.
Never assume a lighter color means the board is sanitized. Cleaning and sanitizing perform different jobs.
Step 5: Sanitize the Board When Necessary
Sanitizing helps reduce microorganisms remaining after ordinary cleaning. It is particularly relevant after preparing raw meat, poultry, or seafood.
Use one of these suitable methods:
- Dishwasher: Use an appropriate cycle only when the board is labeled dishwasher-safe.
- Food-contact sanitizer: Follow the product’s dilution, contact time, and rinsing directions.
- Approved kitchen sanitizing procedure: Follow established food-safety instructions for the sanitizer you use.
Never mix bleach with vinegar, ammonia, or other household cleaners. Mixing cleaning chemicals can release dangerous gases.
For more detail, see the University of Illinois Extension cutting board safety recommendations.
Step 6: Rinse and Dry Completely
Rinse when required by the cleaning or sanitizing product’s instructions. Then allow the board to dry completely.
Position it upright so air reaches both sides. Avoid stacking damp boards inside enclosed cabinets.
Step 7: Perform a Final Safety Inspection
Once dry, look across the surface under good lighting. Make sure no food debris, sticky residue, or loose material remains.
If deep grooves continue to collect debris, replace the board. A clean appearance does not guarantee that a badly damaged cutting surface is safe.
How Does Professional Plastic Cutting Board Resurfacing Work?
Professional resurfacing removes damaged material using equipment suited to the board’s composition. The purpose is to restore a surface that can be properly cleaned and sanitized.
This is different from rubbing ordinary sandpaper across a household board. Professional services must consider material removal, remaining board thickness, surface texture, and cleaning requirements.
What Should You Check Before Professional Resurfacing?
Ask the manufacturer or service provider to confirm the following:
- Material compatibility: Identify the plastic and verify that resurfacing is permitted.
- Structural condition: Confirm the board has no cracks or serious distortion.
- Remaining thickness: Ensure material removal will not compromise strength.
- Surface finish: Verify that the restored surface can be cleaned and sanitized effectively.
- Post-process cleaning: Require complete removal of processing debris before food contact.
A professional service should explain its method and the applicable safety requirements. If it cannot establish that the board will remain suitable for food contact, replacement is preferable.
Is Professional Resurfacing Worth the Cost?
Professional resurfacing may make financial sense for large, thick commercial cutting boards. These products can cost more to replace than small household boards.
For an inexpensive kitchen board, professional service may cost more than replacement. I would compare the total cost before arranging any work.
Can You Sand a Plastic Cutting Board With Sandpaper?
Ordinary DIY sanding is not a generally recommended repair method for food-contact plastic cutting boards. It can introduce fine scratches, alter the surface texture, and generate plastic debris.
Acme Plastics’ HDPE cutting board guidance specifically discourages resurfacing plastic cutting boards through sanding.
Why Can Sanding Create Problems?
- Microscopic scratches: Abrasive marks may provide additional spaces for residue.
- Plastic particles: Sanding releases material that must not contaminate food.
- Changed texture: Removing the original finish can affect grip and cutting behavior.
- Uneven material removal: Hand sanding may leave irregular surface areas.
- Uncertain sanitation: A visually smooth result does not prove that cleaning is effective.
Using progressively finer sandpaper doesn’t automatically solve these issues. A polished-looking board can still have an unsuitable food-contact surface.
Can a Heat Gun Smooth Plastic Scratches?
A heat gun may soften plastic, but it is not a dependable kitchen-board restoration method. Localized heating can distort the surface and change its original properties.
Open flames are even more hazardous. Never melt plastic with a torch or flame to hide knife scratches.
Can You Use a Knife or Scraper to Remove Damage?
Scraping a board with a sharp metal tool can create new cuts and loose plastic fragments. Removing raised material without manufacturer approval also risks making the surface uneven.
Use appropriate cleaning brushes for routine maintenance. Leave material-removal procedures to approved professional methods.
How Do You Remove Scratches From a Plastic Cutting Board?
Shallow scratches usually cannot be erased through cleaning alone. However, ordinary knife marks do not always require removal.
The more useful goal is maintaining a surface that remains easy to wash. Deep cuts that retain food debris call for replacement or approved professional evaluation.
What About White Knife Marks?
White or cloudy streaks often appear where cutting has changed the surface texture. These marks may be more noticeable on darker plastic boards.
Color changes alone do not identify contamination. Inspect the board for raised fragments, rough grooves, and signs of structural wear.
What About Deep Gouges?
Deep gouges present a greater cleaning challenge than superficial discoloration. They may trap food residue beyond the reach of routine washing.
For household boards, replacement is usually the practical answer. Avoid trying to erase deep cuts through uncontrolled grinding or sanding.
Plastic vs. Wood vs. Rubber: Which Cutting Boards Can Be Resurfaced?
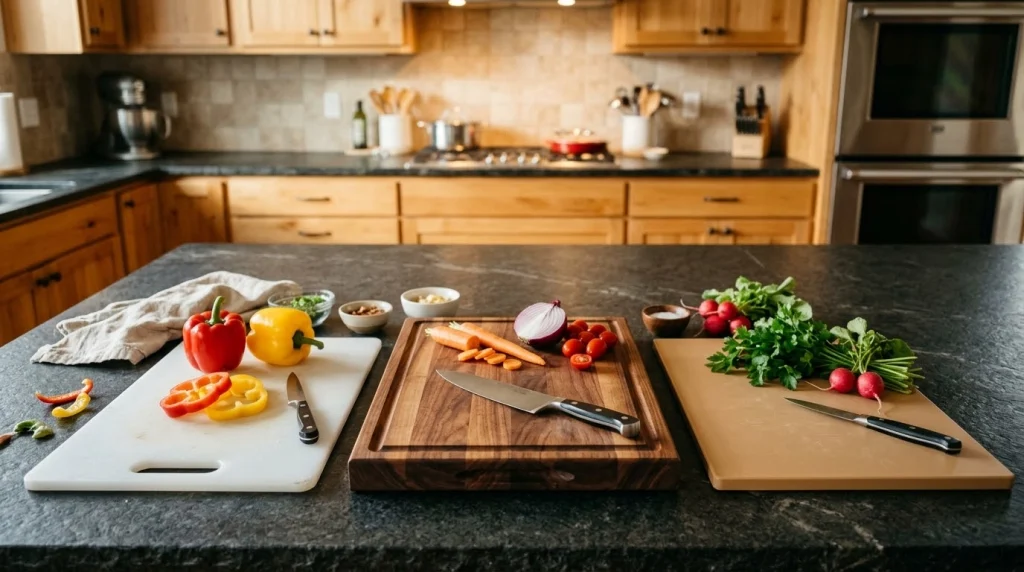
Different cutting board materials require different maintenance methods. A technique suitable for hardwood may be inappropriate for plastic.
| Material | Resurfacing suitability | Typical care |
|---|---|---|
| Household plastic | Generally not recommended for DIY sanding | Wash and replace when badly worn |
| Commercial HDPE | Only when suitable and manufacturer-approved | Commercial cleaning and approved restoration |
| Solid hardwood | Often possible for sound boards | Appropriate sanding and food-safe conditioning |
| Resurfaceable rubber | Depends on manufacturer’s directions | Model-specific refinishing and cleaning |
If your board is wood rather than plastic, read my guide on how to refinish a cutting board. Wooden boards require a different approach to sanding and conditioning.
You can also compare the materials in my wood vs. plastic cutting boards guide.
What Are the Biggest Plastic Cutting Board Restoration Mistakes?
The most common mistake is treating visible scratches as purely cosmetic. The real issue is whether food residue can be removed effectively.
Avoid these approaches:
- Using coarse sandpaper: It can create rough abrasive marks and plastic debris.
- Heating the surface: High temperatures can deform plastic.
- Applying wood oil: Plastic does not require the same conditioning as unfinished hardwood.
- Using harsh chemicals: Unapproved cleaners may damage the surface or leave unsafe residues.
- Ignoring deep grooves: Sanitizing does not replace proper physical cleaning.
- Continuing to use cracked boards: Cracks can affect sanitation and structural reliability.
Another mistake is confusing stain removal with resurfacing. A board can look cleaner while remaining heavily worn.
How Can You Prevent Plastic Cutting Boards From Wearing Out?
Regular maintenance can help prevent unnecessary damage. Although plastic surfaces eventually wear, careful daily habits make replacement decisions easier.
Use the Right Cutting Technique
Use controlled knife movements instead of excessive force. Avoid striking the board harder than necessary.
When moving chopped vegetables, turn the knife and use its spine where appropriate. Don’t repeatedly drag the sharpened edge across plastic.
Separate Raw Meat and Produce
Keep a dedicated board for raw meat, poultry, and seafood whenever possible. Use another clean board for vegetables, bread, and ready-to-eat ingredients.
Separate boards can simplify food preparation and reduce cross-contamination risks. They still require cleaning after every use.
Follow Dishwasher Instructions
Many modern plastic cutting boards are dishwasher-safe. Others may deform under unsuitable washing or drying conditions.
Always check the manufacturer’s instructions before using a dishwasher. Don’t assume every plastic board tolerates the same temperature.
Store Boards Properly
Allow boards to dry before stacking them. Store them where they will not bend under heavy kitchen equipment.
If your cutting board has already developed a curve, my guide on preventing cutting board warping explains useful storage and moisture-control habits.
When Should You Replace a Plastic Cutting Board?
Replace a plastic cutting board when damage prevents effective cleaning or safe use. There is no universal replacement schedule for every household.
Watch for the following conditions:
- Deep grooves that repeatedly trap food
- Cracks extending through the cutting surface
- Peeling or detached plastic fragments
- Permanent warping that affects stability
- Surface damage that remains difficult to sanitize
- Persistent contamination concerns despite proper cleaning
A heavily used board might need replacing sooner than one used occasionally. Surface condition matters more than its calendar age.
For additional material and hygiene considerations, see are plastic cutting boards safe?
What Should You Look for in a Replacement Plastic Cutting Board?
A good replacement should be stable, easy to clean, and suitable for direct food contact. You don’t necessarily need the most expensive model.
Focus on practical construction features:
- Food-contact material: Select a board specifically designed for kitchen use.
- Non-slip design: Rubberized feet or secure grips improve stability.
- Suitable size: Choose enough space for your usual ingredients.
- Convenient cleaning: Prefer dishwasher compatibility when useful.
- Practical thickness: Choose a board that feels stable without becoming unnecessarily heavy.
- Reliable manufacturer: Look for clear product specifications and care instructions.
For everyday cooking, I favor a practical board that stays in place and cleans without difficulty. Expensive features matter less than safe handling and maintenance.
Recommended Plastic Cutting Boards for Replacement
If your existing board has deep cuts or peeling plastic, buying a replacement is often the simplest solution. Here are two established models worth comparing.
Affiliate disclosure: As an Amazon Associate, I may earn from qualifying purchases at no additional cost to you. The ratings below are editorial suitability scores based on listed features, not laboratory tests or customer review averages.
🏆 Best for everyday cooking
OXO Good Grips Utility Cutting Board
★★★★☆ 4/5
This reversible board offers a nonporous cutting surface, non-slip feet, and dishwasher-safe construction. I like its practical design for households seeking a straightforward replacement.
🍽️ Best for heavy-duty preparation
San Jamar Saf-T-Grip Cutting Board
★★★★☆ 4/5
The Saf-T-Grip range includes commercial-style copolymer boards with integrated non-slip corners and multiple size options. I would consider a 12-by-18-inch version for a busy prep station.
Check the exact product dimensions and care instructions before buying. Product variants may differ in thickness, materials, and cleaning requirements.
Frequently Asked Questions
Can you resurface a plastic cutting board at home?
Most household plastic cutting boards should not be resurfaced using ordinary DIY sanding methods. Sanding can create fine grooves and plastic particles that complicate cleaning. If your board has minor scratches, wash it thoroughly and inspect its condition. Replace it when damage prevents effective cleaning.
What grit sandpaper should you use on a plastic cutting board?
There is no universally recommended sandpaper grit for restoring food-contact plastic cutting boards. Different plastic materials and surface finishes respond differently to abrasion. Unless the manufacturer provides an approved refinishing method, avoid sanding and consider replacing a heavily scratched household board instead.
Can you remove deep knife marks from plastic cutting boards?
Deep knife marks generally cannot be removed through ordinary washing. Some suitable commercial boards may qualify for professional resurfacing, depending on their material and condition. For household boards with deep, hard-to-clean grooves, replacement is usually the more practical food-safety choice.
Can you use mineral oil on a plastic cutting board?
Plastic cutting boards generally do not require mineral oil. Unlike unfinished wooden boards, common food-grade plastic cutting surfaces do not need regular oil conditioning. Wash and dry them according to the manufacturer’s directions. Applying oil will not repair scratches or restore damaged plastic.
How often should a plastic cutting board be replaced?
There is no fixed replacement interval that suits every plastic cutting board. Inspect it regularly for excessive scratches, cracks, peeling, and warping. A board used heavily each day may wear faster than one used occasionally. Replace it whenever damage makes effective cleaning difficult.
Final Thoughts: Should You Resurface or Replace Your Plastic Cutting Board?
Learning how to resurface a plastic cutting board starts with understanding its limitations. Not every damaged food-contact surface can be restored safely.
For lightly scratched household boards, thorough cleaning and regular inspection are usually enough. For deeply grooved, cracked, or peeling plastic, replacement is generally the better decision.
Professionally approved resurfacing remains an option for certain commercial boards. However, DIY sanding and melting methods can create new problems instead of solving existing ones.
My recommendation: Inspect your cutting board today and prioritize cleanliness over appearance. A board that remains easy to clean is more valuable than one that merely looks polished.