How to Push Cut With a Chef Knife: Step-by-Step Guide
Quick Answer
To execute a push cut with a chef knife, adopt a secure pinch grip, anchor the tip of the blade on the cutting board, and drive the knife forward and slightly downward in one smooth motion through the ingredient. Unlike the rocking motion, the blade does not lift off the board at the tip, resulting in cleaner separation without crushing cell walls.
Understanding the Push Cut in Kitchen Knife Skills
Mastering knife skills is the single most effective way to elevate your cooking efficiency, consistency, and safety. Among the various cutting techniques used in professional and home kitchens, the push cut stands out as a fundamental cornerstone of efficient prep work.
Many home cooks naturally gravitate toward the rocking chop, where the tip of the knife stays planted while the heel rocks up and down in a semicircular arc. While effective for herbs and small aromatic vegetables, the rocking motion can struggle with uniform slices of dense produce like carrots, onions, or potatoes. The push cut solves this by utilizing the entire length of the blade with a linear forward motion.
Understanding how and when to apply the push cut allows you to slice through ingredients with minimal friction. This guide covers the mechanics, hand positioning, step-by-step execution, and maintenance required to make the push cut second nature.
The Foundation: Grip and Posture Fundamentals
Before examining the blade movement itself, your physical connection to the knife must be optimized. Proper technique begins long before the blade touches the cutting board.
Mastering the Pinch Grip
 Save
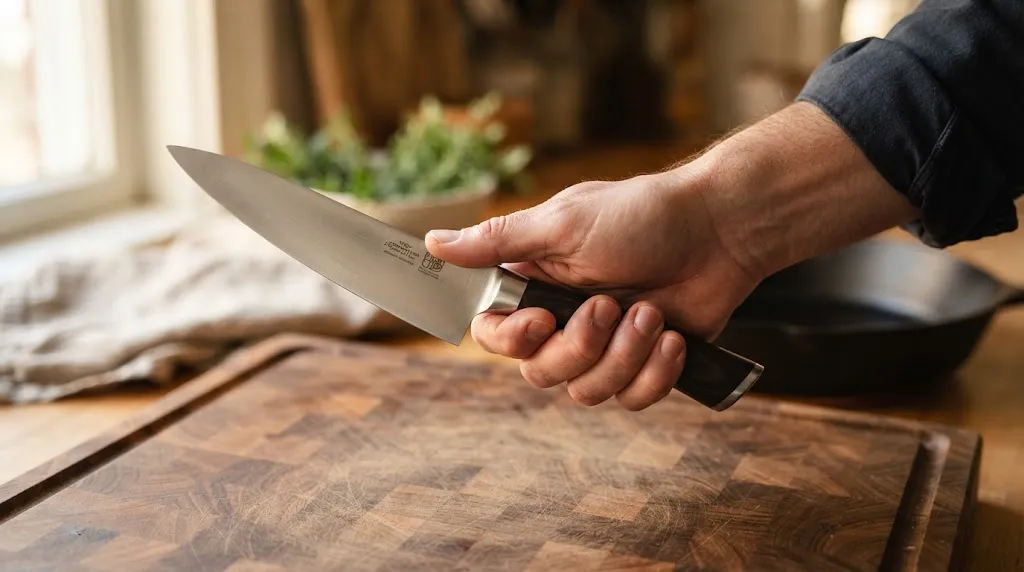
Never hold a chef knife like a baseball bat with all four fingers wrapped tightly around the handle. Instead, use the pinch grip. Place your thumb and the side of your index finger against the sides of the blade right where it meets the handle bolster. Wrap your remaining three fingers securely around the handle.
This grip provides extraordinary stability, turning the knife into a natural extension of your arm rather than an awkward, swinging lever. It prevents the blade from twisting mid-cut and gives you absolute control over the cutting angle.
Establishing the Claw Hand
Your non-dominant hand plays an equally important role. Curl the fingertips of your guiding hand inward toward your palm, creating a “claw” shape. Rest the flat side of the knife blade gently against the knuckles of your middle and index fingers.
This positioning acts as a physical guide and safety barrier. Your knuckles protect your fingertips from accidental cuts while allowing you to slide the blade backward incrementally to measure slice thickness.
Step-by-Step Guide to Executing a Clean Push Cut
Executing a push cut requires deliberate coordination between both hands, smooth downward pressure, and forward momentum. Break down the movement into distinct stages to build muscle memory.
- Position the Ingredient: Place your vegetable or meat firmly on a stable cutting board. Ensure the item has a flat base so it does not wobble or roll while you slice.
- Set the Blade Angle: Rest the rear third of the chef knife blade against the top of the ingredient, positioning the blade at a slight forward angle rather than keeping it completely vertical.
- Align Your Guide Hand: Form your non-dominant hand into the claw shape, resting your knuckles against the flat of the blade to stabilize the ingredient and set your slice width.
- Drive Forward and Down: In one fluid motion, push the knife forward through the item while applying steady downward pressure. The blade should glide horizontally across the board toward the tip.
- Complete the Stroke: Finish the cut as the heel or middle section of the blade reaches the cutting board. Avoid slamming the knife down; let the sharpness of the edge do the work.
- Reset the Blade: Lift the knife back up and slightly backward to your starting position, using your knuckles to guide the ingredient forward for the next slice.
Mechanics: Why the Push Cut Excels
The physics behind the push cut make it superior for structural integrity in produce and proteins. When you rock a knife, you rely heavily on vertical downward force combined with a pivoting arc.
The push cut, by contrast, introduces a horizontal slicing vector. As the blade travels forward across the food, it utilizes the microscopic serrations and sharp edge of the steel like a saw, minimizing cellular compression. This clean separation prevents bruising in delicate items like tomatoes and mushrooms, resulting in longer-lasting freshness and a cleaner appearance on the plate.
Tip
Let the length of your chef knife work for you. Do not try to chop using only the tip or the heel. Utilizing the middle two-thirds of the blade during a push cut provides the most balanced leverage and smooth cutting action.
Common Mistakes When Learning the Push Cut
Developing proper knife technique takes time, and several common errors often hinder beginners during the learning process.
Applying Excessive Downward Force
Many home cooks attempt to chop ingredients by pressing down as hard as possible. If your knife is sharp, heavy downward force is unnecessary. Pushing too hard causes the blade to bind in dense vegetables and increases the risk of slipping off the food.
Flattening the Guide Hand Fingers
Allowing your fingers to point outward toward the blade instead of curling them into a claw position invites injury. Always keep your fingertips tucked securely beneath your knuckles.
Neglecting the Cutting Board Surface
Cutting on glass, granite, or ceramic surfaces dulls knives instantly and causes the blade to skate unpredictably. Always practice your push cut on a stable wooden or high-density plastic cutting board.
Warning
Never attempt a push cut on round or unstable items like small tomatoes or peeled potatoes without first cutting them in half to create a flat, secure resting surface on the board.
Maintaining Blade Sharpness for Effortless Slicing
 Save
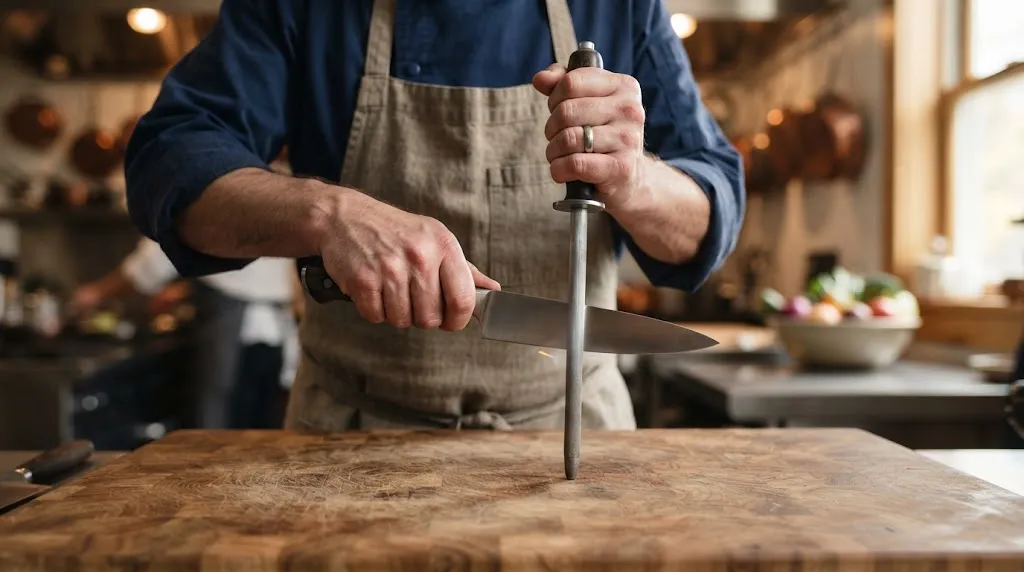
Even the most refined push-cut technique will fail if your chef knife is dull. A dull blade requires excessive downward pressure, turning a precise push cut into a dangerous crushing motion.
Regular maintenance is essential. Use a honing steel before or after heavy prep sessions to realign microscopic burrs along the edge of the blade. For long-term performance, sharpen your knife on a whetstone or professional sharpening system every few months depending on usage frequency.
Related Product
Knife Sharpening Stones
Keep your chef knife razor-sharp to maintain effortless push cuts and clean food separation during meal prep.
As an Amazon Associate, we earn from qualifying purchases.
Frequently Asked Questions
Is the push cut better than the rocking chop?
Neither technique is universally better; they serve different purposes. The push cut excels at clean, uniform slices of firm vegetables and proteins because of the linear sliding motion. The rocking chop is faster and more convenient for mincing herbs, garlic, and small soft ingredients.
What type of chef knife works best for a push cut?
Knives with a flatter blade profile, such as a traditional Japanese Gyuto or a Santoku, naturally lend themselves to push cuts because more of the edge makes simultaneous contact with the board. However, a standard Western chef knife with a slight curve works equally well once you adjust your wrist angle.
How do I prevent my knife from slipping on hard vegetables?
Slipping usually occurs due to a dull blade, improper stance, or an unstable cutting board. Ensure your board is anchored with a damp towel underneath, use a secure pinch grip, and verify that your knife edge is sharp enough to bite into the ingredient immediately.
Should the tip of the knife stay on the board during a push cut?
Unlike the traditional rocking method where the tip often stays planted, the classic push cut typically involves moving the entire blade forward and downward across the food, with the blade either ending flat on the board or gliding past the ingredient entirely.
How fast should I perform a push cut?
Speed is a byproduct of accuracy and muscle memory. When learning, prioritize smooth, deliberate movements and correct hand positioning. Speed will naturally increase as your confidence and consistency improve.
Can I use a push cut for dicing onions?
Yes. The push cut is ideal for making vertical and horizontal incisions when dicing onions. It allows you to slice cleanly through layered flesh without crushing the layers or releasing excessive volatile compounds that cause eye irritation.
Conclusion
Mastering the push cut transforms your kitchen workflow, providing greater precision, cleaner cuts, and enhanced safety during food preparation. By combining a secure pinch grip, a protective claw hand, and a smooth forward slicing motion, you can process ingredients efficiently without damaging their cell structure. Practice these mechanics slowly, keep your blade properly maintained, and you will quickly notice a remarkable improvement in your culinary efficiency.